Easy Chia Seed Pudding Recipe – Healthy Treat
Chia Seed Pudding Recipe is one of those culinary gems that has truly stolen my heart, and I suspect yours will soon follow. This magical dish isn’t just a treat for your taste buds; it’s a powerhouse of nutrition disguised as dessert. What’s not to love? It’s incredibly simple to make, requires no baking, and can be customized with an endless array of flavors. People adore chia seed pudding because it’s the ultimate guilt-free indulgence. Imagin extracte a creamy, dreamy texture that’s both satisfying and incredibly healthy. It’s packed with fiber, omega-3 fatty acids, and antioxidants, making it the perfect breakfast, snack, or even a light dessert. The sheer versatility of a basic chia seed pudding recipe is what truly sets it apart, transforming humble chia seeds into something truly special.
Why You’ll Love This Recipe:
Effortless preparation
Nutrient-dense ingredients
Endlessly adaptable
Chia Seed Pudding Recipe
Chia seed pudding has become a staple in my kitchen, and for good reason! It’s incredibly easy to make, remarkably healthy, and wonderfully versatile. Whether you’re looking for a quick and nutritious breakfast, a satisfying afternoon snack, or even a light dessert, this recipe is your answer. The magic of chia seeds lies in their ability to absorb liquid and transform into a gel-like consistency, creating a wonderfully creamy texture without any dairy or complicated cooking. Plus, they are packed with fiber, omega-3 fatty acids, and antioxidants, making them a fantastic addition to any diet.
I love that this recipe requires just a few simple ingredients that you likely already have on hand. The beauty of it is you can customize it to your heart’s content with different milks, sweeteners, and toppings. This recipe is for a basic, delicious foundation that you can build upon. So, let’s dive into how to make this delightful treat!
Ingredients:
Instructions:
This recipe is incredibly straightforward, and the “cooking” process is really more about letting time do the work. The key is to allow the chia seeds to fully hydrate and create that signature pudding texture.
1. Combine the Wet Ingredients: In a bowl or jar, pour in your 3/4 cup of milk of choice. I often use almond milk or oat milk for a dairy-free option, but regular dairy milk works wonderfully too. Then, add your 1 tablespoon of maple syrup. Maple syrup provides a lovely natural sweetness, but feel free to experiment with agave nectar, honey, or even a sugar-free sweetener if that’s your preference. Finally, stir in the 1 teaspoon of vanilla extract. Vanilla adds a beautiful depth of flavor that complements the nutty notes of the chia seeds perfectly. Whisk these wet ingredients together thoroughly to ensure the sweetener and vanilla are well distributed.
2. Add the Chia Seeds: Now, it’s time to introduce the star of the show: the chia seeds. Sprinkle the 3 tablespoons of chia seeds into the bowl with the liquid mixture. It’s important to add them after the liquid to prevent them from clumping too much at the bottom. Once the chia seeds are in, grab a whisk or a fork and stir vigorously. You want to ensure that every single seed is coated in the liquid and that there are no pockets of dry seeds. This initial stirring is crucial for achieving a smooth, lump-free pudding. Don’t be shy; stir for about 30-60 seconds, making sure to get into all the corners of your bowl.
3. Let It Rest and Stir Again: After your initial vigorous stir, cover the bowl or jar. You can use plastic wrap, a lid, or even a small plate. Let the mixture sit undisturbed for about 5-10 minutes. During this resting period, the chia seeds will begin extract to absorb the liquid and swell. After this initial rest, uncover the mixture and give it another good stir. You’ll notice that it’s already starting to thicken. This second stir is vital to break up any clumps that may have formed and to ensure an even consistency throughout the pudding. If you skip this step, you might end up with a pudding with a thick layer of seeds at the bottom and a more liquidy top.
4. Refrigerate to Thicken: Once you’ve completed the second stir, cover the mixture again and place it in the refrigerator. This is where the magic really happens. You’ll want to let it chill for at least 2-4 hours, but for the absolute best pudding texture, I highly recommend letting it sit overnight. The longer it chills, the thicker and creamier your chia seed pudding will become. During this time, the chia seeds will continue to absorb the liquid, swell, and create that delightful, pudding-like consistency. The cold temperature also helps to firm everything up.
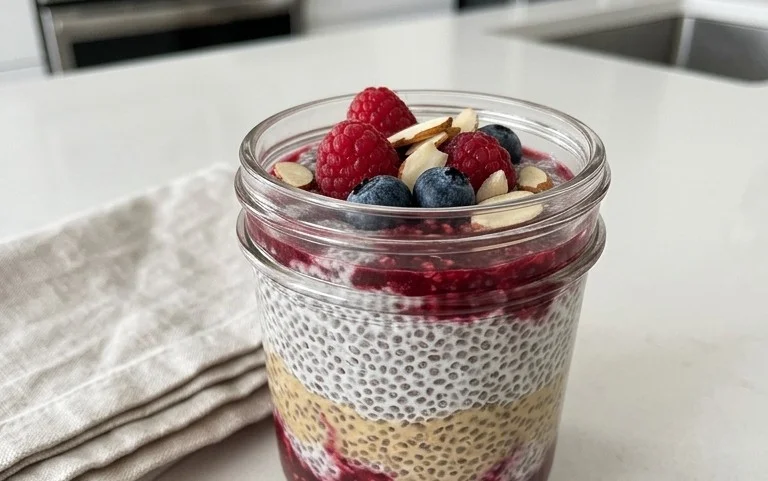
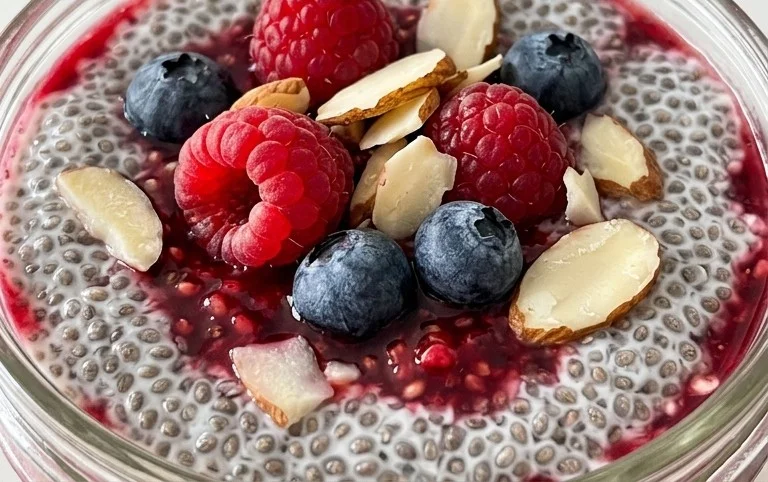
5. Serve and Enjoy: After sufficient chilling time, your chia seed pudding is ready to be enjoyed! Give it one final stir to ensure it’s evenly thickened. Spoon it into serving bowls or glasses. Now comes the fun part: toppings! This is where you can let your creativity shine. Some of my favorite go-to toppings include fresh berries (like raspberries, blueberries, or strawberries), sliced banana, a sprinkle of granola for added crunch, a drizzle of extra maple syrup or honey, a dollop of yogurt (dairy or non-dairy), or even some toasted coconut flakes. You can also add a pinch of cinnamon or nutmeg to the base mixture before chilling for an extra layer of spice. This chia seed pudding is a fantastic make-ahead option, perfect for busy mornings or whenever you need a healthy and delicious boost. Experiment with different flavor combinations and find your perfect pudding!
Conclusion:
There you have it – a simple, healthy, and incredibly versatile Chia Seed Pudding recipe that’s bound to become a staple in your kitchen! This delightful dish is a nutritional powerhouse, packed with fiber, omega-3 fatty acids, and antioxidants, making it a fantastic choice for breakfast, a satisfying snack, or even a light dessert. Its creamy texture and ability to absorb flavors make it a perfect canvas for your culinary creativity. Whether you’re looking for a quick morning meal to fuel your day or a guilt-free treat, this chia seed pudding delivers every time.
Don’t be afraid to experiment with different liquids like coconut milk for a tropical twist, almond milk for a nutty undertone, or even oat milk for a creamier texture. Feel free to stir in your favorite fruits, a dash of cinnamon, vanilla extract, or even a spoonful of cocoa powder for a chocolatey delight. The possibilities are truly endless! I highly encourage you to give this chia seed pudding a try; you might just discover your new favorite healthy indulgence. Enjoy creating your perfect bowl!
Frequently Asked Questions:
Q: How long does chia seed pudding take to set?
Typically, chia seed pudding requires at least 2-4 hours in the refrigerator to thicken and set properly. For the best consistency, I recommend preparing it the night before and letting it chill overnight.
Q: Can I make chia seed pudding without a sweetener?
Absolutely! While sweeteners like maple syrup or honey are common, you can omit them entirely if you prefer. The natural sweetness from fruits you add later, like berries or banana, can often be enough. You can also use dates or stevia for a sugar-free option.
Q: What are some healthy topping ideas for chia seed pudding?
The topping options are endless and add both texture and flavor! Some of my favorites include fresh berries, sliced bananas, chopped nuts (like almonds or walnuts), shredded coconut, granola for crunch, a drizzle of nut butter, or a sprinkle of chia seeds for extra texture. A touch of cocoa nibs is also delicious!
Chia Seed Pudding Recipe
A simple and healthy chia seed pudding recipe that’s quick to prepare and delicious for breakfast or dessert.
Ingredients
-
3 tablespoons chia seeds
-
1 tablespoon maple syrup
-
1 teaspoon vanilla extract
-
3/4 cup almond milk
-
1/4 cup fresh berries (optional topping)
-
Pinch of cinnamon (optional)
Instructions
-
Step 1
In a bowl or jar, combine the chia seeds, maple syrup, and vanilla extract. -
Step 2
Add the almond milk to the bowl and whisk or stir well to ensure no clumps of chia seeds remain. -
Step 3
Let the mixture sit for 5 minutes, then stir again to prevent clumping. -
Step 4
Cover the bowl or jar and refrigerate for at least 5 hours, or preferably overnight, until thickened. -
Step 5
Once thickened, stir the pudding. If it’s too thick, add a splash more milk. -
Step 6
Serve chilled, topped with fresh berries and a pinch of cinnamon, if desired.
Important Information
Nutrition Facts (Per Serving)
It is important to consider this information as approximate and not to use it as definitive health advice.
Allergy Information
Please check ingredients for potential allergens and consult a health professional if in doubt.