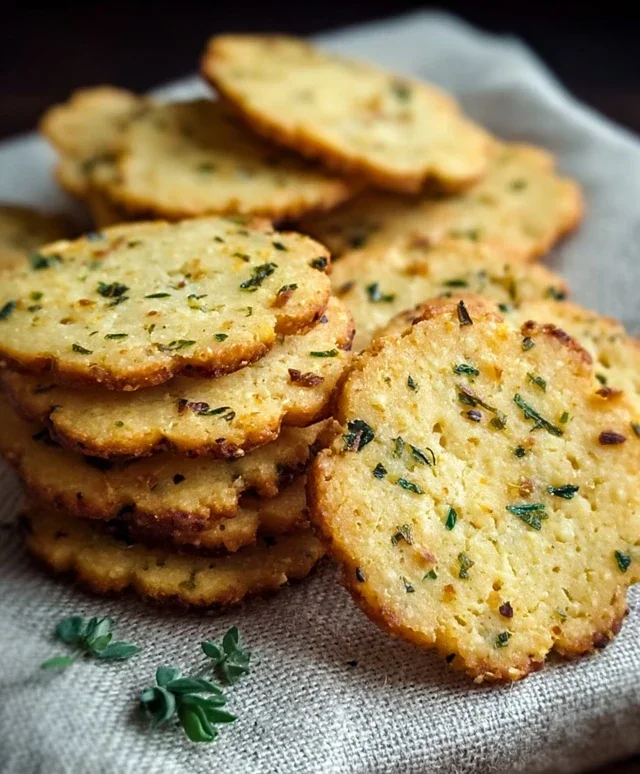
Garlic Herb Chickpea Flour Crackers-Easy Snack
Garlic and Herb Chickpea Flour Snack Crackers are about to become your new pantry obsession. Forget those store-bought bags that taste like cardboard; we’re talking about homemade magic that’s both incredibly satisfying and surprisingly wholesome. If you’re anything like me, you crave a crunchy, flavorful snack that doesn’t derail your healthy eating goals. These delightful Garlic and Herb Chickpea Flour Snack Crackers deliver exactly that. They’re wonderfully versatile, perfect for dipping, topping with cheese, or just enjoying on their own for a guilt-free crunch. What makes them truly special is their simple ingredient list and the explosion of savory flavor you get from the garlic and herbs. You’ll be amazed at how easy it is to whip up a batch that’s far superior to anything you can buy, making these Garlic and Herb Chickpea Flour Snack Crackers an absolute winner.
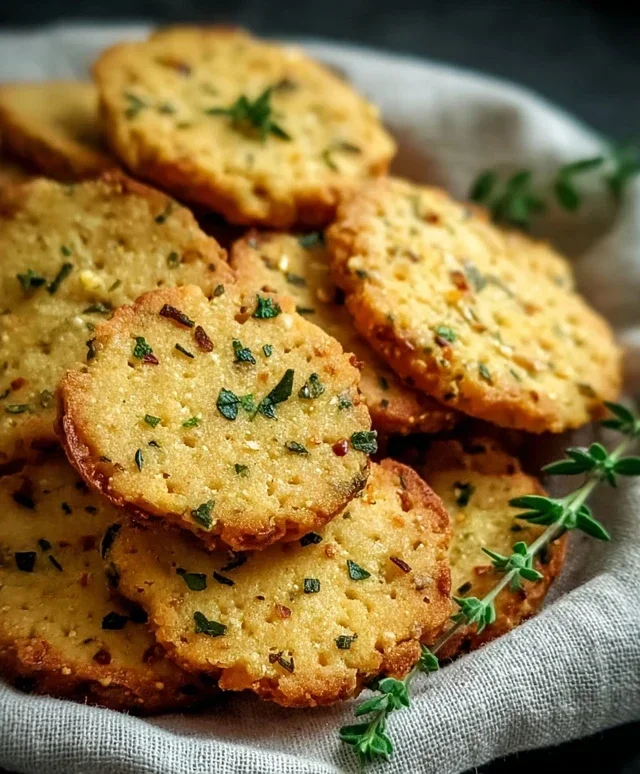
Garlic and Herb Chickpea Flour Snack Crackers
Are you looking for a healthy, delicious, and incredibly easy snack that you can whip up in no time? Look no further! These Garlic and Herb Chickpea Flour Snack Crackers are a game-changer. They’re naturally gluten-free, packed with flavor, and wonderfully versatile. Whether you need a quick afternoon pick-me-up, something to dip into your favorite hummus, or a crunchy addition to a cheese board, these crackers deliver. I love how simple the ingredient list is, and the aroma that fills the kitchen while they’re baking is simply divine. Let’s get baking!
Ingredients:
Preparing the Dough
The foundation of these delightful crackers is chickpea flour, also known as besan. This versatile flour provides a wonderfully nutty flavor and a satisfying crisp texture once baked. In a medium bowl, we’ll combine our dry ingredients. Add the chickpea flour, dried mixed herbs, garlic powder, salt, and black pepper. Give these a good whisk together with a fork to ensure all the spices are evenly distributed throughout the flour. This step is crucial for consistent flavor in every bite.
Next, we’ll introduce the wet ingredients. Create a well in the center of your dry ingredients and pour in the ½ cup of water and 2 tablespoons of olive oil. Now comes the fun part – mixing! You can use a spoon or a spatula to start, but your hands are often the best tool for this. Begin extract to incorporate the dry ingredients into the wet until a cohesive dough starts to form. It might seem a little sticky at first, and that’s perfectly normal. We’re aiming for a dough that’s firm enough to handle but still pliable. If it feels too dry and crum extractbly, add a teaspoon of water at a time until it just comes together. Conversely, if it feels excessively sticky, you can add a tiny sprinkle more of chickpea flour, but be careful not to add too much, as this can make the crackers tough. Knead the dough for a minute or two right in the bowl until it’s smooth and no dry pockets remain.
Rolling and Shaping the Crackers
Now that we have our beautiful dough, it’s time to get it nice and thin for perfect cracker texture. Lightly flour a clean work surface with a little extra chickpea flour or even some all-purpose flour if you prefer. Place your dough ball in the center of the floured surface. You have a couple of options for rolling. You can use a rolling pin, or if you don’t have one, a clean grape juice bottle or even a sturdy glass can work in a pinch. Roll the dough out as thinly as you possibly can. The thinner you roll it, the crispier your crackers will be. Aim for about 1/16 to 1/8 of an inch thickness. Don’t worry if it’s not perfectly uniform; a little rustic charm is part of their appeal!
Once the dough is rolled out, it’s time to cut it into cracker shapes. You can use a pizza cutter, a sharp knife, or even small cookie cutters for fun shapes. I usually just cut mine into squares or rectangles, about 2-3 inches in size. This is also the point where we add those lovely toppings. Gently brush the surface of the rolled-out dough with a little extra olive oil. This oil helps the seeds and salt adhere beautifully and adds another layer of flavor and crispiness. Now, sprinkle generously with sesame seeds, a touch of flaky sea salt for that delightful crunch and burst of flavor, and a little extra dried herbs if you like. You can gently press these toppings into the dough with your hands or the rolling pin to ensure they stick.
Baking to Golden Perfection
Preheat your oven to 350°F (175°C). Line a large baking sheet with parchment paper. This is essential for preventing sticking and ensuring easy cleanup. Carefully transfer the rolled-out and cut dough onto the prepared baking sheet. If your dough is very thin and delicate, you might find it easiest to roll it out directly on the parchment paper and then cut it, minimizing the need to transfer.
Using a fork or a sharp knife, gently prick each cracker a few times. This is called “docking” and it helps to prevent the crackers from puffing up too much in the oven, ensuring they bake evenly and stay flat and crisp.
Now, it’s time for the baking! Place the baking sheet into the preheated oven. Bake for approximately 15-20 minutes. Keep a close eye on them, as oven temperatures can vary. You’re looking for the crackers to be lightly golden brown around the edges and feel firm to the touch. They will continue to crisp up as they cool. If you notice some areas are browning faster than others, you can rotate the baking sheet halfway through the baking time.
Cooling and Enjoying
Once the crackers are baked to your desired crispness, carefully remove the baking sheet from the oven. Let the crackers cool completely on the baking sheet for a few minutes before transferring them to a wire rack to cool down entirely. This cooling process is just as important as the baking for achieving that perfect crunch. As they cool, they will become wonderfully brittle and irresistible.
Once completely cooled, your Garlic and Herb Chickpea Flour Snack Crackers are ready to be enjoyed! They are absolutely delicious on their own as a simple, satisfying snack. They also pair wonderfully with dips like hummus, guacamole, or a creamy yogurt dip. You can also arrange them on a platter with cheeses and charcuterie for a delightful appetizer. Store any leftovers in an airtight container at room temperature for up to a week. I find they are best enjoyed within the first few days for maximum crispness. Enjoy your homemade, healthy, and flavorful snack!
Conclusion:
I hope you’re as excited as I am to whip up a batch of these delicious Garlic and Herb Chickpea Flour Snack Crackers! This recipe is a winner because it’s incredibly simple, uses wholesome ingredients, and results in a satisfyingly crispy and flavorful snack. Whether you’re looking for a gluten-free alternative, a healthier munchie, or just a fantastic way to use up your chickpea flour, these crackers deliver. They are perfect on their own for a quick energy boost, but I also love serving them with my favorite dips like hummus, guacamole, or a creamy herb spread. For a more substantial appetizer, top them with a slice of cheese or some smoked salmon.
Don’t be afraid to get creative with the herbs! Feel free to experiment with fresh rosemary, thyme, or even a pinch of red pepper flakes for a bit of heat. The versatility of these Garlic and Herb Chickpea Flour Snack Crackers means you can tailor them to your exact taste preferences. So go ahead, give them a try – I’m confident you’ll be delighted with the results and will find yourself reaching for them again and again!
Frequently Asked Questions:
Q: How should I store these crackers?
Store your cooled crackers in an airtight container at room temperature for up to a week. For maximum crispness, it’s best to eat them within a few days. If they lose a bit of their crunch, you can briefly pop them back into a low oven (around 250°F or 120°C) for a few minutes to revive them.
Q: Can I make these crackers nut-free?
Absolutely! This recipe is naturally nut-free as it relies on chickpea flour. It’s a fantastic option for those with nut allergies or looking for a nut-free snack.
Q: What is chickpea flour and where can I find it?
Chickpea flour, also known as gram flour or besan, is made from ground dried chickpeas. It’s a staple in many cuisines, particularly Indian and Middle Eastern. You can find it in the international aisle of most well-stocked grocery stores, health food stores, or online retailers. It provides a wonderful texture and a slightly earthy flavor to these crackers.
Garlic and Herb Chickpea Flour Snack Crackers
Crispy and flavorful homemade crackers made with chickpea flour, garlic, and herbs. Perfect for dipping or enjoying on their own.
Ingredients
-
1 cup chickpea flour (besan)
-
½ cup water
-
2 tablespoons olive oil
-
1 teaspoon dried mixed herbs
-
1 teaspoon garlic powder
-
½ teaspoon salt
-
¼ teaspoon black pepper
-
Sesame seeds
-
Flaky sea salt
-
Additional dried herbs
-
Extra olive oil for brushing
Instructions
-
Step 1
Preheat oven to 350°F (175°C) and line a baking sheet with parchment paper. -
Step 2
In a medium bowl, whisk together chickpea flour, dried mixed herbs, garlic powder, salt, and black pepper. -
Step 3
Add the water and olive oil to the dry ingredients. Mix until a thick, cohesive dough forms. It will be sticky. -
Step 4
Place the dough between two sheets of parchment paper and roll it out as thinly as possible, to about 1/16 inch thick. -
Step 5
Carefully transfer the rolled-out dough (still on parchment) to the prepared baking sheet. Score the dough into desired cracker shapes using a knife or pizza cutter. Sprinkle with sesame seeds, flaky sea salt, and additional dried herbs. -
Step 6
Brush the surface lightly with extra olive oil. -
Step 7
Bake for 15-20 minutes, or until the edges are golden brown and the crackers are crisp. Break apart along the scored lines.
Important Information
Nutrition Facts (Per Serving)
It is important to consider this information as approximate and not to use it as definitive health advice.
Allergy Information
Please check ingredients for potential allergens and consult a health professional if in doubt.