17 Easy Easter Dessert Recipes – Best Ideas for Kids and For a Crowd are about to fill your home with the sweet scent of spring! Easter is a time for gathering, for joy, and of course, for indulgin extractg in delicious treats. We all love Easter desserts because they capture the magic of the season – think pastel colors, playful decorations, and flavors that evoke warmth and celebration. Whether you’re planning a small family brunch or a large neighborhood get-together, having a repertoire of impressive yet simple Easter dessert recipes is key to a successful celebration. These are the moments that create lasting memories, and the desserts are often the stars of the show, bringin extractg smiles to faces young and old. Get ready to discover your new favorite ways to bring a touch of sweetness to your Easter festivities, with plenty of options that are both kid-approved and crowd-pleasing!
Why We Adore These Easy Easter Dessert Recipes
Making Easter Sweeter for Everyone
17 Easy Easter Dessert Recipes – Best Ideas for Kids and For a Crowd
Easter is a time for joy, family, and of course, delicious treats! Whether you’re planning a festive brunch, a lively Easter egg hunt for the kids, or a full-blown gathering with loved ones, having a selection of delightful desserts is key. This year, I’ve curated a list of 17 easy Easter dessert recipes that are sure to impress everyone, from the littlest bunnies to the most discerning grown-ups. We’ve got everything from classic favorites with an Easter twist to fun, no-bake options and visually stunning showstoppers. Get ready to fill your Easter table with sweetness and smiles!
Let’s dive into a few of my absolute favorites that are perfect for both small family gatherings and larger crowds.
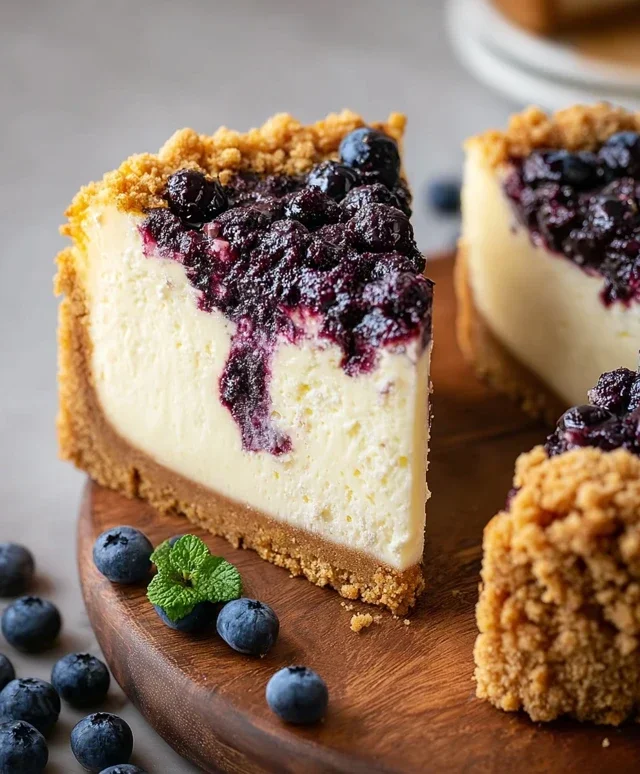
Lemon Cheesecake
This Lemon Cheesecake is wonderfully bright and refreshing, a perfect contrast to richer Easter fare. It’s surprisingly simple to make and always a crowd-pleaser.
Ingredients:
1 ½ cups grabeef ham cracker crum extractbs (about 10-12 full sheets)
⅓ cup granulated sugar
6 tablespoons unsalted butter, melted
2 (8-ounce) packages cream cheese, softened
¾ cup granulated sugar
2 large eggs
1 teaspoon vanilla extract
½ cup sour cream
¼ cup fresh lemon juice (from about 1-2 lemons)
1 tablespoon lemon zest (from about 1-2 lemons)
Instructions:
Prepare the Crust: Preheat your oven to 350°F (175°C). In a medium bowl, combine the grabeef ham cracker crum extractbs and ⅓ cup of granulated sugar. Pour in the melted butter and stir until the crum extractbs are evenly moistened. This mixture will resemble wet sand.
Form the Crust: Press the crum extractb mixture firmly and evenly into the bottom of a 9-inch springform pan. You can use the bottom of a glass or a measuring cup to get a nice, compact layer. Make sure to press it up the sides a little bit if you like a sturdier crust.
Bake the Crust: Place the springform pan on a baking sheet and bake for 8-10 minutes, or until lightly golden and fragrant. This step helps to set the crust and prevent it from becoming soggy. Let the crust cool completely while you prepare the filling.
Make the Cheesecake Filling: In a large bowl, beat the softened cream cheese with the ¾ cup granulated sugar using an electric mixer on medium speed until smooth and creamy. Scrape down the sides of the bowl as needed to ensure no lumps remain.
Incorporate the Eggs and Flavorings: Add the eggs one at a time, beating well after each addition until just combined. Be careful not to overmix, as this can incorporate too much air and lead to cracks in the cheesecake. Stir in the vanilla extract, sour cream, lemon juice, and lemon zest. Mix on low speed until everything is just incorporated and smooth. The batter should be a beautiful pnon-alcoholic ale yellow color.
Bake the Cheesecake: Pour the filling over the cooled crust in the springform pan. Gently tap the pan on the counter a few times to release any air bubbles. Bake for 45-55 minutes, or until the edges are set and the center is still slightly jiggly. It will continue to set as it cools.
Cool and Chill: Turn off the oven, but leave the cheesecake inside with the oven door slightly ajar for about an hour. This slow cooling process helps prevent cracking. Remove the cheesecake from the oven and let it cool completely on a wire rack. Once cooled, cover it with plastic wrap and refrigerate for at least 4 hours, or preferably overnight, for the best flavor and texture.
Serve: Carefully run a knife around the edge of the pan before releasing the springform. Garnish with fresh berries, a dollop of whipped cream, or even a few candied lemon slices for an extra touch of elegance.
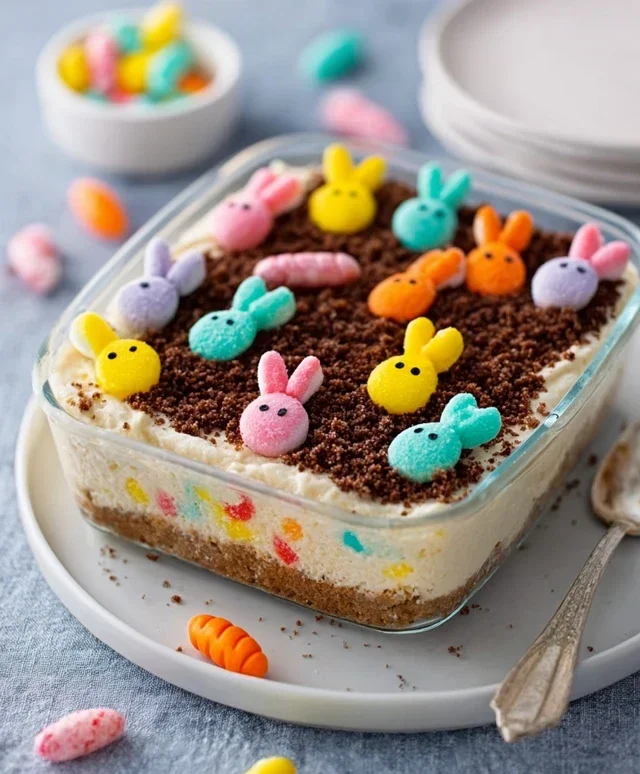
Easter Garden Cake
This Easter Garden Cake is a whimsical delight, perfect for bringin extractg a touch of springtime magic to your celebration. It looks impressive but is surprisingly manageable to create.
Ingredients:
1 box (15.25 oz) yellow cake mix
Ingredients for cake mix (usually eggs, oil, water)
Green food coloring
1 can (16 oz) vanilla frosting
Green sprinkles
Assorted Easter candies (jelly beans, chocolate eggs, candy flowers)
Optional: Edible flowers for decoration
Instructions:
Bake the Cake: Prepare the yellow cake mix according to package directions. Divide the batter evenly between two 8-inch round cake pans.
Color the Batter: To one bowl of batter, add a few drops of green food coloring and mix until you achieve a vibrant green hue. This will be your “grass” layer. Leave the other bowl of batter its origin extractal yellow color.
Bake and Cool: Bake both cakes according to package directions until a toothpick inserted into the center comes out clean. Let them cool in the pans for 10 minutes before inverting them onto a wire rack to cool completely.
Assemble the Garden Base: Once the cakes are completely cool, place the yellow cake layer on your serving platter. This will be the base of your garden.
Create the Grass Layer: Frost the top of the yellow cake with a thin layer of vanilla frosting. Then, place the green cake layer on top. This green layer will act as the “soil” or “grass” base for your edible garden.
Frost and Decorate: Frost the entire outside of the green cake with the remaining vanilla frosting. Don’t worry about making it perfectly smooth; a slightly textured surface can mimic the look of a garden.
Add the Green Sprinkles: While the frosting is still wet, generously sprinkle the entire cake with green sprinkles. This will create the appearance of lush green grass.
Plant Your Edibles: Now for the fun part! Arrange your assorted Easter candies and edible flowers on top of the sprinkled cake to create your Easter garden scene. Use jelly beans for colorful blooms, chocolate eggs for hidden treasures, and candy flowers for extra charm. Get creative and let your imagin extractation bloom!
Funfetti Cake Mix Cookies
These Funfetti Cake Mix Cookies are a guaranteed hit with kids! They’re incredibly easy to make, require minimal ingredients, and are bursting with colorful sprinkles.
Ingredients:
1 box (15.25 oz) funfetti cake mix
2 large eggs
½ cup vegetable oil
1 teaspoon vanilla extract
Optional: Additional sprinkles for rolling
Instructions:
Preheat and Prep: Preheat your oven to 350°F (175°C). Line baking sheets with parchment paper to prevent sticking and for easy cleanup.
Combine Ingredients: In a large bowl, combine the funfetti cake mix, eggs, vegetable oil, and vanilla extract. Stir with a wooden spoon or spatula until just combined. The dough will be thick and somewhat sticky.
Form the Cookies: Roll the dough into 1-inch balls. If you’re using additional sprinkles for rolling, place them in a shallow dish. Roll each dough ball in the sprinkles until evenly coated. This adds an extra pop of color and fun!
Bake: Place the cookie balls about 2 inches apart on the prepared baking sheets. Bake for 9-11 minutes, or until the edges are lightly golden and the centers are set but still look slightly soft. They will continue to firm up as they cool.
Cool: Let the cookies cool on the baking sheets for 5 minutes before transferring them to a wire rack to cool completely. These cookies are best enjoyed at room temperature.
Coconut Macaroon Nests
These adorable Coconut Macaroon Nests are a delightful and elegant addition to your Easter dessert table. They’re naturally gluten-free and have a wonderful chewy texture.
Ingredients:
3 cups shredded sweetened coconut
½ cup granulated sugar
¼ cup all-purpose flour
¼ teaspoon salt
2 large egg whites
½ teaspoon vanilla extract
Mini chocolate eggs or candy-coated chocolate eggs for filling
Instructions:
Preheat and Prep: Preheat your oven to 325°F (160°C). Line baking sheets with parchment paper.
Combine Dry Ingredients: In a medium bowl, whisk together the shredded coconut, granulated sugar, all-purpose flour, and salt. Ensure everything is well combined.
Add Wet Ingredients: In a separate small bowl, lightly beat the egg whites until frothy. Stir in the vanilla extract.
Mix the Dough: Pour the egg white mixture into the dry ingredients and stir until everything is thoroughly combined and the mixture starts to clump together. It will be sticky.
Form the Nests: Using two spoons or a small cookie scoop, drop mounds of the coconut mixture onto the prepared baking sheets, leaving about 2 inches between them. You can shape them into little nests by pressing a small indentation in the center of each one with your thumb or the back of a spoon.
Bake: Bake for 15-18 minutes, or until the edges are golden brown and the tops are lightly toasted. Keep an eye on them as coconut can brown quickly.
Fill the Nests: Remove the baking sheets from the oven. While the nests are still warm, carefully place a few mini chocolate eggs or candy-coated chocolate eggs into the indentations you made. The residual heat will help them adhere slightly.
Cool Completely: Let the coconut macaroon nests cool completely on the baking sheets before handling them. This allows them to firm up.
Carrot Strawberries
These “Carrot Strawberries” are a playful and healthy-ish treat that kids will adore. They’re a fun way to incorporate fruit into your dessert offerings.
Ingredients:
1 pound fresh strawberries, washed and hulled
8 ounces cream cheese, softened
¼ cup powdered sugar
½ teaspoon vanilla extract
Green gel food coloring
Optional: A few mint leaves for stems
Instructions:
Prepare the Strawberries: Pat the strawberries completely dry with paper towels. This is crucial for the cream cheese to adhere properly.
Make the Cream Cheese Filling: In a medium bowl, beat the softened cream cheese with the powdered sugar and vanilla extract until smooth and creamy.
Create the “Carrot” Mixture: Take about half of the cream cheese mixture and place it in a separate small bowl. Add a few drops of orange food coloring (or a mix of red and yellow) and stir until you achieve a carrot-like color.
Stuff the Strawberries: Using a small spoon or a piping bag fitted with a small round tip, carefully fill the hollowed-out part of the strawberries with the orange cream cheese mixture. You can also just spread it in if you don’t have piping tools.
Make the “Leaves”: In the remaining white cream cheese mixture, add a tiny amount of green gel food coloring. Mix well until you have a light green color.
Decorate: Using a small spoon or piping bag, add a few dollops of the green cream cheese mixture to the top of the stuffed strawberries to resemble carrot tops. If you have fresh mint leaves, you can gently insert one into the green cream cheese for extra stem detail.
Chill and Serve: Place the finished carrot strawberries on a plate or serving platter and refrigerate for at least 30 minutes to allow the cream cheese to firm up before serving.
This collection offers a fantastic starting point for your Easter dessert planning. From these detailed recipes to the remaining 12 ideas that I’ll be sharing soon, you’re sure to find the perfect sweet ending to your Easter celebration! Happy baking and happy Easter!
Conclusion:
Easter is a time for joy, family, and of course, delicious treats! With these 17 Easy Easter Dessert Recipes, you’re sure to find the perfect sweet ending for your celebrations, whether you’re baking for a few little ones or a large gathering. We’ve curated a collection that prioritizes simplicity, visual appeal, and crowd-pleasing flavors. From adorable bunny-shaped cookies to decadent cakes that will impress even the most discerning palates, these recipes are designed to make your Easter baking stress-free and incredibly rewarding.
Don’t be afraid to get creative! Many of these ideas are wonderfully adaptable. Feel free to swap out frosting colors, add your favorite sprinkles, or incorporate seasonal fruits. For a crowd, consider a dessert bar featuring a few smaller options, allowing everyone to sample a variety of these delightful Easter desserts. These recipes are more than just instructions; they’re invitations to create lasting memories in the kitchen. So gather your ingredients, put on some festive music, and embark on a sweet journey that’s sure to bring smiles all around. We encourage you to try at least one, or even a few, of these fantastic recipes!
Frequently Asked Questions:
Can I make these desserts ahead of time?
Many of these 17 Easy Easter Dessert Recipes are perfect for making ahead. Cookies can often be baked and stored in airtight containers a day or two in advance. Cakes and cupcakes can also be baked a day ahead and frosted closer to serving time to maintain freshness. Some no-bake options are designed for immediate enjoyment or can be assembled a few hours before guests arrive.
Are there any gluten-free or vegan options included?
While not every recipe in the collection is inherently gluten-free or vegan, most can be easily adapted. Look for recipes that naturally lend themselves to substitutions, such as those using fruit or simple batters. Many recipes can be made gluten-free by using a good quality gluten-free flour blend, and vegan substitutions for eggs and dairy are widely available and effective.
What are some creative ways to decorate these Easter desserts?
Beyond the suggested decorations, think about using edible flowers, pastel-colored sanding sugar, chocolate eggs, jelly beans, or even piped frosting designs like bunnies, chicks, or Easter lilies. For a fun activity, consider having a DIY decorating station for some of the simpler cookies or cupcakes, letting kids personalize their own treats.
Instructions
-
Step 1
For Lemon Cheesecake: Beat softened cream cheese with sugar until smooth. Incorporate eggs one at a time, then stir in lemon zest.
-
Step 2
Pour the cheesecake filling into a prepared graham cracker crust.
-
Step 3
Bake in a preheated oven at 350°F (175°C) for 45-50 minutes, or until the center is set.
-
Step 4
For Easter Garden Cake: Prepare a basic cake batter using flour, sugar, eggs, and vanilla. Divide batter and tint with green, pink, and yellow food coloring.
-
Step 5
Layer the colored batters in a cake pan and bake according to your cake recipe instructions.
-
Step 6
For Funfetti Cake Mix Cookies: Combine cake mix with softened butter and eggs. Stir in sprinkles.
-
Step 7
Drop spoonfuls of dough onto a baking sheet and bake at 375°F (190°C) for 8-10 minutes.
-
Step 8
For Coconut Macaroon Nests: Mix shredded coconut with sweetened condensed milk and melted butter. Form into small nest shapes.
-
Step 9
Bake at 300°F (150°C) for 12-15 minutes until golden brown.
-
Step 10
For Carrot Strawberries: Grate carrots finely. Mix with a small amount of melted butter and bake until tender. Shape into small strawberry-like mounds. Slice strawberries and use as leaves.
Important Information
Nutrition Facts (Per Serving)
It is important to consider this information as approximate and not to use it as definitive health advice.
Allergy Information
Please check ingredients for potential allergens and consult a health professional if in doubt.