Daisy Lemon Meringue Pies-Sweet Citrus Delight
Daisy Lemon Meringue Pies are more than just a dessert; they are a sunshine-filled experience in every bite. There’s something inherently joyful about a classic lemon meringue pie, isn’t there? It’s that perfect balance of tart, creamy lemon filling nestled within a buttery crust, all crowned with ethereal, cloud-like meringue that’s toasted to golden perfection. I’ve always adored the contrast of textures and flavors – the crisp, flakey pastry, the smooth, zesty custard, and the melt-in-your-mouth sweetness of the meringue. What truly elevates our Daisy Lemon Meringue Pies, however, is the delicate touch that makes them undeniably special. It’s a recipe honed to bring out the brightest citrus notes while ensuring a meringue that stands tall and proud, a testament to simple ingredients transformed into something truly magical. Prepare to be charmed by these delightful Daisy Lemon Meringue Pies!
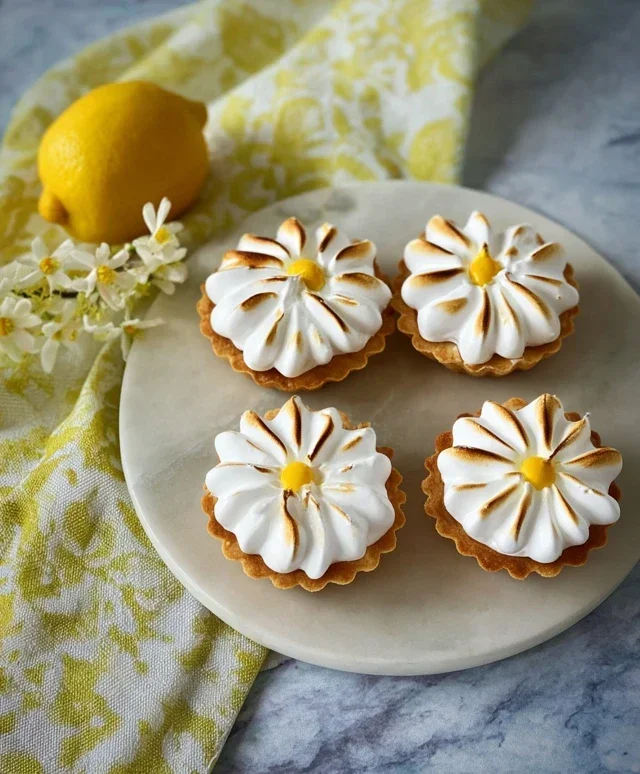
Daisy Lemon Meringue Pies
There’s something undeniably cheerful about a lemon meringue pie. The bright, tangy filling, the cloud-like sweetness of the meringue – it’s a classic for a reason. And when you add a delicate ‘daisy’ decoration to the meringue, it transforms into something truly special, perfect for a celebration or just a delightful afternoon treat. Today, we’re going to make these charming Daisy Lemon Meringue Pies from scratch, ensuring a perfect crust, a zesty filling, and a beautifully browned, billowy meringue. Let’s get started!
Ingredients:
Preparing the Pie Crust
The foundation of any great pie is a good crust, and for these Daisy Lemon Meringue Pies, we’re making a simple, buttery shortcrust pastry that bakes up wonderfully crisp.
1. In a medium bowl, combine the 125g plain flour and 35g icing sugar. Whisk them together briefly to ensure they are well mixed. This step helps to distribute the sugar evenly, preventing any pockets of sweetness and contributing to a tender crust.
2. Add the 60g cold unsalted butter, cut into small cubes. Using cold butter is crucial for a flaky pastry. Rub the butter into the flour and sugar mixture with your fingertips or a pastry blender until it resembles coarse breadcrum extractbs. You want to see some small, pea-sized pieces of butter remaining; these will melt during baking, creating those desirable flaky layers. Don’t overwork the dough at this stage.
3. In a small cup, whisk together the 1 large egg yolk and 1 tbsp water. Make a well in the center of the flour and butter mixture and pour in the egg yolk and water.
4. Gently bring the mixture together with a knife or a spatula until it just starts to form a dough. Be careful not to knead it. Once it’s crum extractbly and starting to clump, lightly press it together with your hands until it forms a cohesive ball. If it seems too dry, you can add another teaspoon of cold water, but be very sparing.
5. Flatten the dough into a disc, wrap it tightly in cling film, and refrigerate for at least 30 minutes. This chilling period allows the gluten to relax, making the dough easier to roll out and preventing shrinkage during baking. While the dough chills, you can prepare your pie dish and preheat your oven. For this recipe, a standard 23cm (9-inch) pie dish is perfect.
Once the dough has chilled, lightly flour your work surface and rolling pin. Roll out the dough to about 3mm thickness, large enough to line your pie dish with some overhang. Gently ease the dough into the dish, pressing it into the corners and up the sides. Trim any excess dough, leaving about a 1cm overhang, which you can then fold under and crimp decoratively. Prick the base of the pie crust all over with a fork. This is called “docking” and prevents the pastry from puffing up during blind baking.
Blind Baking the Crust
Blind baking means baking the crust before adding the filling. This ensures a crisp bottom that won’t turn soggy under the moist lemon filling.
1. Preheat your oven to 180°C (160°C fan/350°F/Gas Mark 4).
2. Line the pastry case with baking parchment and fill it with baking beans, rice, or dried pulses. This weight helps to keep the pastry in shape.
3. Bake for 15 minutes. Then, carefully remove the parchment and beans and bake for another 5-7 minutes, or until the crust is pnon-alcoholic ale golden and looks dry. This initial bake ensures the base is cooked through.
4. Remove from the oven and let it cool slightly while you prepare the lemon filling.
Crafting the Tangy Lemon Filling
This filling is what gives our pies their signature zesty punch. It’s rich, smooth, and perfectly balanced by the sweet meringue.
1. In a medium, heatproof bowl, whisk together the 4 large egg yolks, 150g granulated sugar, and 40g cornflour. Whisk vigorously until smooth and no lumps of cornflour remain. This mixture will be quite thick.
2. Gradually whisk in the 120ml fresh lemon juice and the zest of 1 lemon. The lemon juice will help to loosen the mixture.
3. Place the bowl over a saucepan of gently simmering water (ensure the bottom of the bowl doesn’t touch the water). This is a double boiler or bain-marie method, which cooks the filling gently and prevents the egg yolks from scrambling.
4. Stir continuously with a whisk for about 8-10 minutes, or until the mixture has thickened considerably, coating the back of a spoon. It should be the consistency of a thick custard.
5. Remove the bowl from the heat. Add the 125g unsalted butter, cut into cubes, and stir until it’s completely melted and incorporated, giving the filling a beautiful sheen and extra richness.
6. Pour the hot lemon filling into the pre-baked pie crust. Smooth the top with a spatula.
Whipping Up the Daisy Meringue
Now for the show-stopping meringue! We’re going to create those iconic daisy petals for a beautiful finish.
1. Ensure your mixing bowl and whisk are scrupulously clean and grease-free. Any trace of fat will prevent the egg whites from whipping up properly. Place the 4 large egg whites in the bowl. Add the 1 tsp cream of tartar (if using) which helps to stabilize the meringue.
2. Start whisking the egg whites on a medium speed until they form soft peaks. This means when you lift the whisk, the peaks will droop over.
3. Gradually add the 200g granulated sugar, a tablespoon at a time, while continuing to whisk on high speed. Allow each addition of sugar to dissolve completely before adding more. This slow addition is key to achieving a smooth, glossy, and stable meringue.
4. Continue whisking for about 5-7 minutes, or until the meringue is stiff, glossy, and the sugar has completely dissolved. To test, rub a little meringue between your fingers; it should feel smooth, not gritty. Stir in the 1 tsp vanilla extract.
5. To create the daisy effect, spoon large dollops of meringue around the edge of the lemon filling, like petals. Use the back of a spoon to create soft, rounded shapes. Then, fill in the center with more meringue, creating a slightly mounded center. You can also use a piping bag with a large star tip for more defined petals.
6. Bake in the preheated oven at 170°C (150°C fan/325°F/Gas Mark 3) for 20-25 minutes, or until the meringue is golden brown and toasted. Keep a close eye on it as meringues can brown quickly.
7. Once baked, turn off the oven and leave the pie inside with the door ajar for about 30 minutes. This gradual cooling helps to prevent the meringue from cracking.
8. Remove the pie from the oven and let it cool completely on a wire rack before slicing and serving. This allows the filling to set fully.
Enjoy your beautiful and delicious Daisy Lemon Meringue Pies! They are a true delight for the eyes and the palate.

Conclusion:
And there you have it – a foolproof guide to creating stunning and utterly delicious Daisy Lemon Meringue Pies! This recipe truly shines because it balances the zesty, tangy punch of lemon curd with the ethereal sweetness of a perfectly toasted meringue, all nestled within a crisp, buttery crust. It’s a dessert that looks as impressive as it tastes, making it ideal for special occasions, family gatherings, or simply when you want to treat yourself to something truly spectacular. Don’t be intimidated by the meringue; with a little care and attention, you’ll achieve those beautiful peaks and swirls every time.
Serve your masterpiece slightly chilled to allow the flavors to meld beautifully. A dollop of fresh whipped cream on the side is always a welcome addition, or a scattering of fresh berries can offer a delightful contrast in color and flavor. Feel adventurous? Consider adding a touch of almond extract to the lemon filling for a subtle nutty undertone, or experiment with a grabeef ham cracker crust for a different texture. I truly encourage you to give this Daisy Lemon Meringue Pie recipe a go. The joy of sharing such a delightful creation, and the satisfaction of mastering this classic, is immense. Happy baking!
Frequently Asked Questions:
Can I make the lemon filling ahead of time?
Absolutely! The lemon filling can be prepared a day in advance and stored, covered, in the refrigerator. This can save you precious time on the day you plan to assemble and bake your pie, allowing you to focus on getting that perfect meringue.
My meringue is weeping. What did I do wrong?
Meringue weeping is usually caused by either under-whipping the egg whites, not dissolving the sugar completely, or baking at too low a temperature for too long. Ensure your egg whites are at room temperature and free of any yolk. Whip them until stiff, glossy peaks form, and the sugar is fully dissolved. Baking at a slightly higher temperature (around 350°F or 175°C) for a shorter duration, until lightly golden, can also help prevent weeping.
Daisy Lemon Meringue Pies
Individual lemon meringue pies with a crisp pastry crust and a tangy lemon filling topped with fluffy meringue.
Ingredients
-
125g plain flour
-
35g icing sugar
-
60g cold unsalted butter
-
1 large egg yolk
-
1 tbsp water
-
200g caster sugar
-
50g cornflour
-
300ml milk
-
4 large egg whites
-
1 tsp cream of tartar
Instructions
-
Step 1
To make the pastry, rub the butter into the flour and icing sugar until it resembles breadcrumbs. Add the egg yolk and water, then mix to a dough. Wrap in cling film and chill for 30 minutes. -
Step 2
Preheat oven to 190°C (170°C fan/gas mark 5). Roll out the pastry and line 4 individual tart tins. Prick the bases with a fork, line with baking parchment and fill with baking beans. -
Step 3
Bake for 15 minutes. Remove the parchment and beans, then bake for another 5 minutes until lightly golden. Reduce oven temperature to 160°C (140°C fan/gas mark 3). -
Step 4
To make the filling, whisk together the caster sugar, cornflour and lemon zest in a saucepan. Gradually whisk in the milk and egg yolks. Cook over a medium heat, stirring constantly, until thickened. Stir in the lemon juice. -
Step 5
Pour the lemon filling into the pastry cases. -
Step 6
Whisk the egg whites with the cream of tartar until stiff peaks form. Spoon the meringue over the lemon filling, ensuring it seals to the pastry edges. -
Step 7
Bake for 10-15 minutes until the meringue is golden brown.
Important Information
Nutrition Facts (Per Serving)
It is important to consider this information as approximate and not to use it as definitive health advice.
Allergy Information
Please check ingredients for potential allergens and consult a health professional if in doubt.