Easy Mini Cannoli Cups Recipe-Delicious Dessert
Mini Cannoli Cups: the delightful bite-sized rendition of an Italian classic, are here to steal your heart (and your taste buds)! If you’ve ever swooned over the crisp, golden shell and the impossibly creamy ricotta filling of a traditional cannoli, get ready to fall even harder. We’ve taken all the irresistible elements of this beloved dessert and miniaturized them, creating an easily shareable, perfectly portioned treat that’s ideal for any occasion. What makes these Mini Cannoli Cups so special? It’s that perfect textural contrast – the satisfying crunch giving way to the sweet, velvety filling, often studded with chocolate chips or candied fruit. They’re the perfect little indulgence, offering all the flavor and elegance of their full-sized counterparts without the mess or the commitment. Get ready to impress your friends and family with these adorable and utterly delicious Mini Cannoli Cups!

Mini Cannoli Cups
Get ready to impress your friends and family with these adorable and incredibly easy Mini Cannoli Cups! Forget the hassle of rolling and frying traditional cannoli shells. We’re taking a shortcut that’s just as delicious and much more approachable for the home baker. These delightful little treats capture all the classic cannoli flavors – creamy ricotta filling and a crisp, slightly sweet shell – in a bite-sized package. Perfect for parties, a sweet afternoon pick-me-up, or anytime you’re craving something special.
Ingredients:
Preparing the Delicious Filling
The heart of any cannoli is its rich, creamy filling. For our mini cups, we’ll be creating a delightful ricotta mixture that’s both simple and decadent. Start by ensuring your ricotta cheese is well-drained. This is a crucial step to prevent a watery filling. You can drain it by placing it in a fine-mesh sieve lined with cheesecloth or a coffee filter set over a bowl for at least 30 minutes, or even overnight in the refrigerator. Once drained, transfer the ricotta to a medium bowl.
Now, it’s time to sweeten and flavor this creamy base. Add the 1/2 cup of powdered sugar to the ricotta. This sugar will dissolve beautifully, contributing to a smooth texture. Next, incorporate the 2 tablespoons of granulated sugar. While powdered sugar provides sweetness and smoothness, granulated sugar adds a subtle textural element. For a burst of bright, fresh flavor, stir in the 1 teaspoon of finely grated orange or lemon zest. I love the fragrant aroma that fills the kitchen at this stage! Finally, add the 1/2 teaspoon of vanilla extract. This classic flavor enhancer rounds out the filling beautifully. Use a spatula or a wooden spoon to gently but thoroughly combine all the ingredients until the mixture is smooth and homogenous. Avoid overmixing, as this can sometimes make the ricotta too liquidy. Once combined, cover the bowl and refrigerate the filling while you prepare the crusts. This allows the flavors to meld together.
Crafting the Crispy Cups
The genius of this recipe lies in its use of refrigerated pie crusts for the shells. No more wrestling with dough! Begin extract by preheating your oven to 375°F (190°C). Lightly grease a mini muffin tin (you’ll need about 24 cups). This will prevent the crusts from sticking and ensure easy removal.
Unroll your softened pie crusts according to the package directions. You’ll want to work with them quickly so they don’t become too sticky. Using a 2.5 to 3-inch round cookie cutter, cut out as many circles as possible from each pie crust. You should aim to get about 12 circles from each crust, for a total of 24. If the dough becomes too warm and sticky to handle, pop it back into the refrigerator for a few minutes.
Gently press each dough circle into the prepared mini muffin cups, making sure the dough comes up the sides. You’re essentially creating little pastry cups. Don’t worry if they aren’t perfectly smooth; a rustic look is part of their charm! You can use your fingers to gently press the dough into the bottom and up the sides of each cup.
Baking the Shells to Perfection
Before baking, we’re going to give our little cups a sweet and spicy coating. In a small bowl, combine the 3 tablespoons of turbinado sugar (also known as raw sugar) with the 1 teaspoon of ground cinnamon. This mixture adds a delightful crunch and a warm, spiced aroma as they bake. Sprinkle about 1/2 teaspoon of this turbinado sugar and cinnamon mixture over the dough in each mini muffin cup. This topping will caramelize beautifully in the oven, providing a lovely contrast to the creamy filling.
Place the filled mini muffin tin into the preheated oven. Bake for 12-15 minutes, or until the edges of the pastry cups are golden brown and slightly puffed. Keep a close eye on them during the last few minutes, as oven temperatures can vary. You want them to be nicely browned but not burnt.
Once baked, carefully remove the mini muffin tin from the oven. Let the cups cool in the tin for about 5-10 minutes. This allows them to firm up. Then, gently remove the baked cups from the tin and transfer them to a wire rack to cool completely. It’s important that the cups are completely cool before filling, otherwise, the filling might melt.
Assembling Your Mini Cannoli Masterpieces
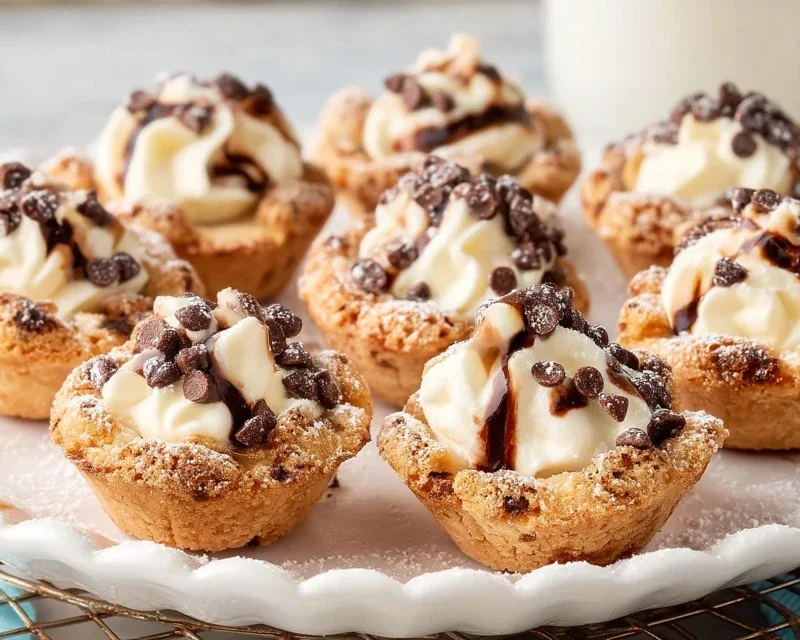
With your cannoli shells cooled and your ricotta filling chilled, it’s time for the final, fun step: assembly! Take your ricotta filling out of the refrigerator. Give it a quick stir to ensure it’s smooth. Spoon or pipe the filling into each cooled cannoli cup. You can use a spoon for a more rustic look, or a piping bag fitted with a plain tip for a neater presentation. Fill them generously, but don’t overstuff them to the point where the filling spills out.
Now for the finishing touches! Dip the ends of each filled cannoli cup into the miniature semisweet chocolate chips or finely chopped pistachios. This mimics the traditional cannoli’s decorative ends and adds a delightful texture and flavor contrast. If you’re using chocolate chips, you might want to gently press them into the filling so they adhere. For pistachios, a light dusting works wonderfully.
Finally, dust the tops of your Mini Cannoli Cups with a little additional powdered sugar just before serving. This adds that classic cannoli finish and a touch of elegance. These are best enjoyed the same day they are assembled to ensure the crispness of the shells. Enjoy every delightful, bite-sized moment!
Conclusion:
I hope you’ve enjoyed this journey into creating these delightful Mini Cannoli Cups! These little treats are truly wonderful because they capture all the classic, irresistible flavors and textures of traditional cannoli – the crisp shell, the creamy ricotta filling, and a hint of sweetness – all in a perfectly portioned, bite-sized package. They are fantastic for parties, dessert buffets, or simply as an indulgent afternoon pick-me-up. The beauty of this Mini Cannoli Cups recipe lies in its versatility and the joy it brings.
For serving, I absolutely love presenting them on a tiered platter for a stunning visual effect. They pair wonderfully with a strong espresso or a sweet dessert grape juice. Don’t be afraid to get creative with variations! You can stir in mini chocolate chips, finely chopped pistachios, or even a touch of orange zest into the filling for a different flavor profile. You could also dust them with powdered sugar or drizzle them with melted chocolate before serving. I truly encourage you to give this recipe a try. It’s surprisingly straightforward and the results are incredibly rewarding. Happy baking!
Frequently Asked Questions:
Can I make the cannoli shells ahead of time?
Yes, you can! Baked and cooled cannoli shells can be stored in an airtight container at room temperature for up to 2 days. It’s best to fill them just before serving to ensure the shells remain wonderfully crisp.
What if I don’t have a cannoli form?
No worries! You can improvise by using small metal or foil tartlet pans, or even by shaping small rounds of dough around the outside of a greased and floured muffin tin cup while baking. They might not have the exact cylindrical shape, but they will still be delicious!
How long will the filled Mini Cannoli Cups last?
Once filled, these Mini Cannoli Cups are best enjoyed within a few hours. The moisture from the filling can soften the shells over time. If you have leftovers, store them in an airtight container in the refrigerator for up to 24 hours, but be aware the shells will be less crisp.
Mini Cannoli Cups
Delightful mini cannoli cups featuring a creamy ricotta filling nestled in a crisp baked pie crust, perfect for a sweet treat.
Ingredients
-
1 container whole-milk ricotta cheese (15 oz., drained)
-
1/2 cup powdered sugar
-
2 tablespoons granulated sugar
-
1 teaspoon finely grated orange zest
-
1/2 teaspoon vanilla extract
-
1 box refrigerated pie crusts, softened as directed on box (2 count)
-
3 tablespoons turbinado sugar
-
1 teaspoon ground cinnamon
-
1/4 cup miniature semisweet chocolate chips
-
additional powdered sugar for dusting
Instructions
-
Step 1
Preheat oven to 375°F (190°C). Lightly grease a 24-cup mini muffin tin. -
Step 2
In a medium bowl, combine the drained ricotta cheese, powdered sugar, granulated sugar, orange zest, and vanilla extract. Stir until smooth and well combined. -
Step 3
Unroll the refrigerated pie crusts. Use a 2.5-inch round cookie cutter to cut out 24 circles. -
Step 4
Gently press each dough circle into a mini muffin cup, forming a shell. Prick the bottom of each shell with a fork a few times. -
Step 5
Bake for 10-12 minutes, or until golden brown and crisp. Let cool in the tin for a few minutes before carefully transferring to a wire rack to cool completely. -
Step 6
In a small bowl, mix the turbinado sugar and ground cinnamon. Roll the edges of the cooled pie crust shells in the cinnamon-sugar mixture. -
Step 7
Spoon or pipe the ricotta filling into the cooled cannoli cups. Sprinkle with miniature chocolate chips. -
Step 8
Dust with additional powdered sugar just before serving.
Important Information
Nutrition Facts (Per Serving)
It is important to consider this information as approximate and not to use it as definitive health advice.
Allergy Information
Please check ingredients for potential allergens and consult a health professional if in doubt.