Crispy Chicken Caesar Sandwich-Easy & Delicious
Crispy Chicken Caesar Sandwich – the very name conjures up images of golden-brown chicken, crisp romaine lettuce, and that unmistakable creamy Caesar dressing. Who doesn’t adore this classic combination transformed into a handheld delight? It’s a dish that speaks to our souls, a perfect balance of textures and flavors that makes every bite an event. We’ve all been there, craving that satisfying crunch of perfectly fried chicken, the cool crispness of fresh greens, all brought together by the tangy, garlicky embrace of Caesar dressing. What makes this particular Crispy Chicken Caesar Sandwich so special, you ask? It’s about elevating a beloved salad into a hearty, satisfying meal without sacrificing any of its iconic essence. Get ready to experience your favorite Caesar salad in an entirely new, incredibly delicious dimension.
Crispy Chicken Caesar Sandwich
There’s something undeniably satisfying about a perfectly executed sandwich. When you combine the savory crunch of fried chicken with the creamy tang of a classic Caesar dressing, all nestled between soft bread, you’ve got a winner. This Crispy Chicken Caesar Sandwich recipe takes that classic combination and elevates it, creating a meal that’s both comforting and exciting. Forget soggy chicken or bland dressing; we’re aiming for a symphony of textures and flavors that will have you reaching for a second helping.
This recipe is all about building layers of deliciousness. We start with perfectly seasoned chicken cutlets, coated in a simple yet effective flour mixture and pan-fried to golden perfection. While the chicken is doing its thing, we whip up a homemade Caesar dressing that’s leagues beyond anything you’ll find in a jar. The fresh lemon juice, sharp Parmesan, and subtle garlic create a vibrant dressing that complements the richness of the chicken beautifully. Finally, we assemble everything for that ultimate sandwich experience.
This recipe is also surprisingly adaptable. While I’ve outlined my favorite way to build this sandwich, feel free to experiment with different types of bread, add your favorite crunchy greens, or even spice up the chicken coating. The key is the quality of your ingredients and the care you put into each step. Let’s get cooking!
Ingredients:
Cooking Instructions
1. Prepare the Caesar Dressing:
This is where the magic begin extracts! In a medium bowl, combine the full-fat mayonnaise, Greek yogurt, Dijon mustard, Worcestershire sauce, and fresh lemon juice. Whisk these ingredients together until they are smoothly incorporated. The Greek yogurt adds a lovely creaminess without making the dressing too heavy, and the Dijon mustard provides a subtle kick that balances the richness of the mayo. Next, fold in the freshly grated Parmesan cheese. Using freshly grated Parmesan is crucial here; it melts better and has a more vibrant flavor than pre-shredded options. Add the minced garlic cloves, ¼ teaspoon of black pepper, and a pinch of sea salt. Stir everything together until well combined. Taste and adjust seasoning as needed – you might want a little more lemon for tang or a touch more salt. Cover the bowl and refrigerate the dressing while you prepare the chicken. This allows the flavors to meld beautifully.
2. Prepare and Season the Chicken:
We’re going to create a flavorful crust on our chicken. Pat your chicken cutlets dry with paper towels. This is an important step as it helps the flour mixture adhere better and ensures a crispier final product. Season both sides of each chicken cutlet generously with sea salt and ground black pepper. Don’t be shy with the seasoning; this is your main flavor base for the chicken. In a shallow dish or plate, combine the ⅓ cup of all-purpose flour with ½ teaspoon of salt. This simple coating will provide a fantastic crispiness once fried.
3. Coat and Fry the Chicken:
Dredge each seasoned chicken cutlet thoroughly in the seasoned flour mixture, making sure to coat both sides evenly. Gently shake off any excess flour. Heat a generous amount of oil in a large skillet over medium-high heat. You want enough oil to come about ¼ inch up the sides of the pan; this will ensure even frying. The oil is ready when a tiny piece of flour dropped into it sizzles immediately. Carefully place the floured chicken cutlets into the hot oil, being careful not to overcrowd the pan. Fry for about 3-5 minutes per side, or until golden brown and cooked through. The exact cooking time will depend on the thickness of your chicken cutlets. Use a meat thermometer to ensure the internal temperature reaches 165°F (74°C). Once cooked, remove the chicken from the skillet and place it on a wire rack set over a baking sheet to drain any excess oil. This will help maintain its crispiness.
4. Toast the Bread:
While the chicken is resting, it’s time to prepare your bread. I love using soft, slightly sturdy rolls or slices of good quality bread for this sandwich. You can toast them lightly in a toaster, under the broiler, or even in the same skillet you used for the chicken after you’ve wiped it clean and added a tiny bit of butter or oil. Toasting the bread adds another layer of texture and prevents it from becoming soggy from the dressing and chicken juices. Aim for a light golden brown and a slightly crisp exterior.
5. Assemble the Sandwich:
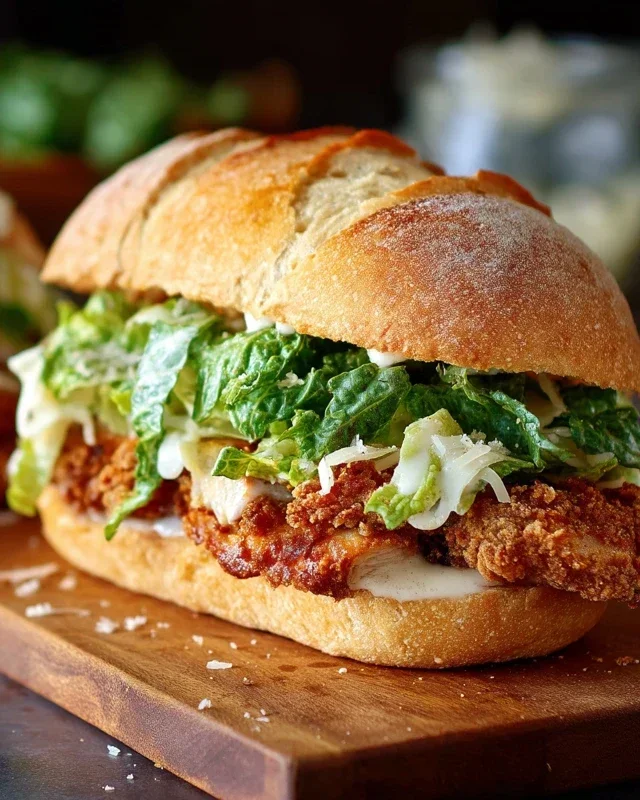
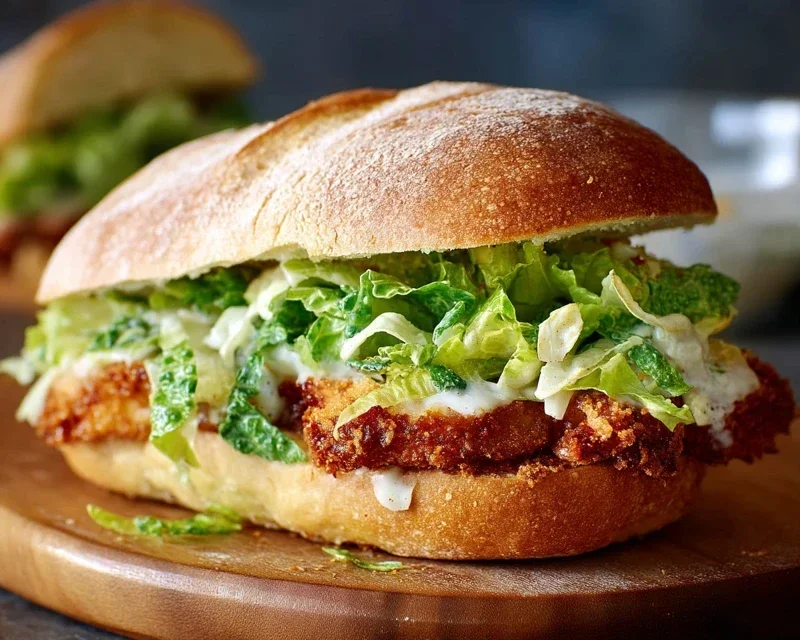
This is the grand finnon-alcoholic ale! Take your toasted bread and spread a generous amount of the prepared Caesar dressing on the inside of both halves. Place one or two of the crispy chicken cutlets on the bottom half of the bread. If your cutlets are larger, you might want to slice them into more manageable pieces. Add your favorite sandwich fillings. Classic additions include crisp romaine lettuce leaves, extra shavings of Parmesan cheese, and perhaps a few thin slices of tomato. Top with the other half of the bread, pressing down gently. You can slice the sandwich in half for easier eating. Serve immediately and enjoy every delicious, crunchy, creamy bite!
Note 1: Chicken Cutlets
For this recipe, chicken cutlets are ideal. If you can’t find pre-cut chicken cutlets, you can easily make your own by taking boneless, skinless chicken breasts and slicing them horizontally to create thinner pieces. You can also pound them slightly between two pieces of plastic wrap to achieve a uniform thickness. This ensures even cooking and a more tender chicken breast.
Conclusion:
And there you have it – your guide to crafting the ultimate Crispy Chicken Caesar Sandwich! This recipe truly shines because it delivers that satisfying crunch from perfectly fried chicken, balanced by the creamy, tangy Caesar dressing and the fresh bite of romaine lettuce. It’s a flavor explosion that elevates a classic to a whole new level. I find this sandwich is fantastic served warm, right after assembly, but it also holds up well for a packed lunch, with the bread retaining a nice texture.
For serving suggestions, think simple sides that complement the richness of the sandwich. A crisp coleslaw, a light green salad, or even a bowl of seasoned sweet potato fries would be delightful accompaniments. If you’re feeling adventurous, don’t hesitate to explore variations! Consider using grilled chicken for a lighter option, adding a sprinkle of Parmesan cheese on top for an extra cheesy kick, or even incorporating some crispy beef bacon for a smoky, savory twist. I wholeheartedly encourage you to give this Crispy Chicken Caesar Sandwich a try; I’m confident you’ll fall in love with its delicious simplicity!
FAQs:
Can I make the chicken ahead of time?
Absolutely! You can bread and fry the chicken pieces a few hours in advance. Let them cool completely on a wire rack before storing them in an airtight container in the refrigerator. To reheat, a quick few minutes in a toaster oven or air fryer will bring back that delightful crispiness.
What’s the best bread for this sandwich?
While brioche buns offer a wonderful soft texture and slight sweetness that complements the chicken beautifully, other great options include sturdy sourdough, a classic ciabatta roll, or even a crusty baguette. The key is a bread that can hold up to the filling without becoming soggy.
My Caesar dressing is too thick/thin. How can I adjust it?
If your dressing is too thick, whisk in a teaspoon of water or lemon juice at a time until it reaches your desired consistency. For a thinner dressing, gradually mix in a little more olive oil or a touch more of the liquid from your anchovy paste (if using).
Crispy Chicken Caesar Sandwich
A delicious and satisfying sandwich featuring crispy pan-fried chicken with a homemade Caesar dressing.
Ingredients
-
5 chicken cutlets
-
½ cup full-fat mayonnaise
-
3 tbsp Greek yogurt
-
1 tsp Dijon mustard
-
1 tsp Worcestershire sauce
-
2 tbsp lemon juice
-
¼ cup Parmesan cheese (freshly grated)
-
1-2 garlic cloves (minced)
-
¼ tsp black pepper
-
Pinch sea salt
-
sea salt (to taste)
-
ground black pepper (to taste)
-
Oil (for frying)
-
⅓ cup all-purpose flour
-
½ tsp salt
Instructions
-
Step 1
In a medium bowl, whisk together mayonnaise, Greek yogurt, Dijon mustard, Worcestershire sauce, lemon juice, Parmesan cheese, minced garlic, ¼ tsp black pepper, and a pinch of sea salt. This is your Caesar dressing. Set aside. -
Step 2
Season the chicken cutlets generously with sea salt and ground black pepper on both sides. -
Step 3
In a shallow dish, combine the all-purpose flour and ½ tsp salt. -
Step 4
Dredge each chicken cutlet in the seasoned flour, shaking off any excess. -
Step 5
Heat a generous amount of oil in a large skillet over medium-high heat. Once hot, carefully place the floured chicken cutlets in the skillet. -
Step 6
Fry the chicken for about 3-5 minutes per side, or until golden brown and cooked through. Remove from skillet and drain on a paper towel-lined plate. -
Step 7
To assemble the sandwich, spread a generous amount of the prepared Caesar dressing on your preferred bread. Top with a crispy chicken cutlet and add any additional toppings as desired (e.g., lettuce, extra Parmesan).
Important Information
Nutrition Facts (Per Serving)
It is important to consider this information as approximate and not to use it as definitive health advice.
Allergy Information
Please check ingredients for potential allergens and consult a health professional if in doubt.