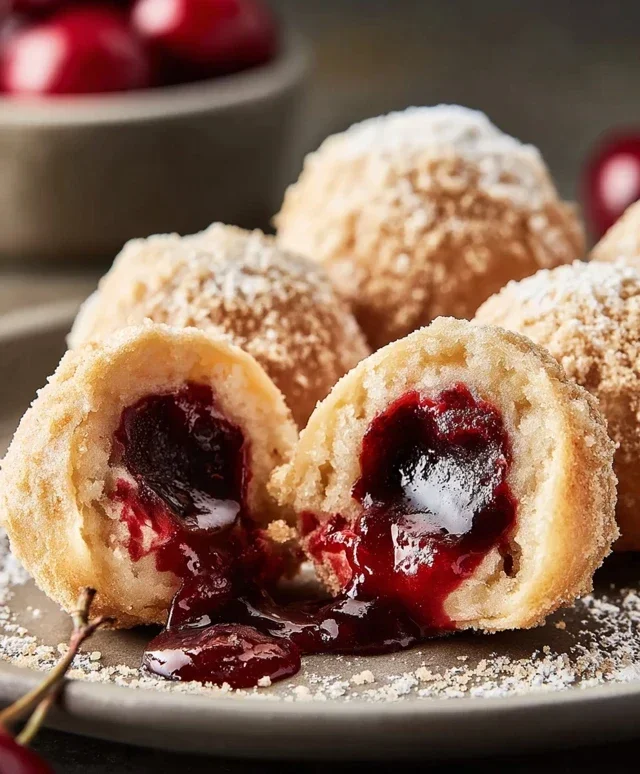
Delicious Cherry Pie Bombs- Easy Dessert Recipe
Cherry Pie Bombs are more than just a dessert; they’re little bursts of pure joy! If you’re anything like me, the thought of warm, gooey cherry filling encased in a flaky, golden crust is enough to make your taste buds sing. We all know and love the classic cherry pie, but these Cherry Pie Bombs take that beloved flavor and elevate it into an irresistible, bite-sized delight. What makes them so special? It’s the perfect balance of tart cherries and sweet pastry, all wrapped up in a convenient, individual portion. Imagin extracte the satisfying crunch as you bite into the tender dough, followed by the explosion of that vibrant, homemade cherry filling. They’re perfect for parties, picnics, or simply when you crave a comforting treat that’s both familiar and excitingly new. Get ready to fall head over heels for these incredible Cherry Pie Bombs – they’re about to become your new favorite indulgence.
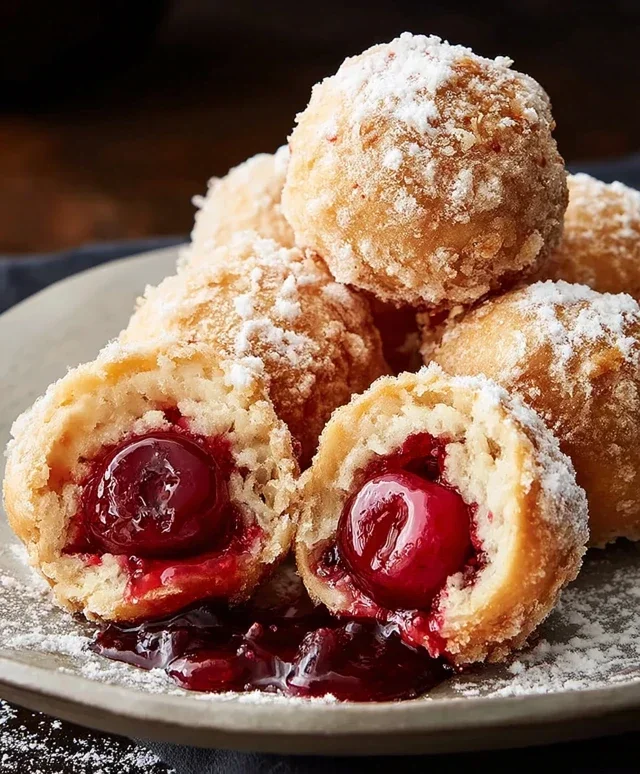
Cherry Pie Bombs
Get ready to embark on a culinary adventure that’s as fun to make as it is to devour! These Cherry Pie Bombs are a delightful twist on a classic dessert, transforming the beloved flavors of cherry pie into irresistible, bite-sized explosions of sweetness. Imagin extracte flaky biscuit dough, bursting with warm, gooey cherry filling, all encased in a crisp, golden shell and drizzled with a luscious glaze. They’re perfect for parties, potlucks, or simply as a special treat to brighten your day. You’ll be amazed at how simple these are to whip up, and the smiles they’ll bring are truly priceless.
Ingredients:
Get Ready to Create Some Deliciousness
Gathering your ingredients is the first step to a successful baking (or in this case, frying!) endeavor. You’ll need a can of those wonderfully flaky Grands “Big” biscuits – the bigger, the better for these bombs! Next, grab your cherry pie filling. You can use store-bought for convenience or, if you’re feeling ambitious, whip up your own homemade version. For the delectable glaze that’s going to take these bombs to the next level, you’ll need powdered sugar, milk, and a touch of light corn syrup to ensure that silky smooth, glossy finish. And of course, a generous amount of vegetable oil is essential for achieving that perfect crispy exterior. Make sure you have a good, deep pot or Dutch oven for frying, and a slotted spoon or spider strainer for safely removing your hot bombs.
Crafting Your Cherry Pie Bombs
Now for the fun part – assembling and frying!
1. Prepare the Biscuit Dough: Carefully open your can of Grands “Big” biscuits. You’ll want to gently separate the biscuits from each other. Don’t stretch or flatten them too much at this stage; we want to maintain their inherent fluffiness. Take one biscuit and, using your fingers or a rolling pin, flatten it out into a slightly larger disc, about 4-5 inches in diameter. The key here is to get it thin enough to encase the filling but not so thin that it will tear easily. You want a nice, pliable base for our cherry filling.
2. Fill and Seal the Bombs: Spoon about 1-2 tablespoons of the cherry pie filling into the center of each flattened biscuit. Be generous, but don’t overfill, as this can make it difficult to seal properly and might cause the filling to ooze out during frying. Now, carefully bring the edges of the biscuit dough up and around the cherry filling, pinching them together firmly to create a senon-alcoholic aled ball. Think of it like making a little pouch. Really press those seams together to ensure no delicious cherry goodness escapes during its hot oil bath. If any dough seems a little thin or there are small tears, you can gently patch them with a small piece of leftover biscuit dough, pressing it firmly to seal.
3. Heat the Frying Oil: Pour enough vegetable oil into a heavy-bottomed pot or Dutch oven to reach a depth of about 3-4 inches. This will ensure your Cherry Pie Bombs can be fully submerged and fry evenly. Heat the oil over medium-high heat until it reaches approximately 350°F (175°C). It’s crucial to maintain this temperature; too low, and your bombs will be greasy, too high, and they’ll burn before cooking through. A kitchen thermometer is your best friend here, but you can also test the oil by dropping in a tiny piece of biscuit dough; if it sizzles and floats to the top immediately, the oil is ready.
4. Fry to Golden Perfection: Gently, and I mean gently, place 2-3 Cherry Pie Bombs into the hot oil at a time. Do not overcrowd the pot, as this will lower the oil temperature and result in uneven frying. Use your slotted spoon or spider strainer to carefully lower them in. Fry the bombs for about 2-3 minutes per side, or until they are beautifully golden brown and puffed up. They should look like little fried dough balls with a hint of cherry peeking through if you’re lucky! Carefully remove them from the oil with your slotted spoon, allowing any excess oil to drip back into the pot. Place the fried bombs on a wire rack set over a baking sheet to drain further and cool slightly. This step is important to prevent them from becoming soggy.
5. Whip Up the Luscious Glaze: While your Cherry Pie Bombs are draining, it’s time to prepare the irresistible glaze. In a medium bowl, whisk together the powdered sugar and milk until you achieve a smooth, lump-free consistency. Add the light corn syrup and whisk again. The corn syrup adds a beautiful sheen and a subtle chegrape juicess to the glaze, preventing it from hardening too quickly. If the glaze seems too thick, add a tiny bit more milk, a teaspoon at a time, until it reaches your desired drizzling consistency. If it’s too thin, gradually whisk in a little more powdered sugar.
6. Glaze and Enjoy: Once your Cherry Pie Bombs have cooled just enough to handle but are still warm, it’s time for the grand finnon-alcoholic ale! Drizzle the luscious glaze generously over the tops of the warm bombs. The warmth of the bombs will help the glaze spread and create those beautiful, artistic drizzles. You can use a spoon or a piping bag for more controlled decorating. Serve your Cherry Pie Bombs immediately for the ultimate experience of warm, gooey cherry filling, crispy fried dough, and sweet, creamy glaze. They are absolutely divine!
Conclusion:
There you have it – your guide to creating irresistible Cherry Pie Bombs! These delightful little treats are the perfect marriage of flaky pastry and a sweet, tart cherry filling. I truly believe this recipe is fantastic because it offers all the beloved flavors of a classic cherry pie in a convenient, bite-sized package. They’re surprisingly easy to make, making them a wonderful project for both begin extractner bakers and seasoned pros looking for a quick crowd-pleaser. The golden, buttery crust encasing the burst of cherry goodness is simply divine.
When it comes to serving these Cherry Pie Bombs, the possibilities are endless! They are absolutely delicious served warm with a scoop of vanilla bean ice cream for a classic dessert experience. For a lighter touch, a dollop of fresh whipped cream or a dusting of powdered sugar is also perfect. They make fantastic additions to potlucks, holiday gatherings, or even just a special afternoon treat. Don’t be afraid to get creative with variations! You could try adding a pinch of almond extract to the filling for a sophisticated twist, or even mix in a few fresh raspberries for a delightful berry medley. Perhaps a sprinkle of cinnamon in the crust dough? The joy of baking is experimentation, so have fun with it!
I sincerely hope you’ll give these Cherry Pie Bombs a try. I know you’ll fall in love with their charm and incredible flavor. They’re a guaranteed hit, and the smiles they bring are well worth the effort.
FAQs:
Can I use fresh cherries instead of frozen?
Absolutely! If using fresh cherries, you’ll want to pit them and then follow the same instructions for cooking down the filling. You might need to adjust the cooking time slightly depending on how juicy your fresh cherries are. Ensure they are well-drained before filling your pastry.
How should I store leftover Cherry Pie Bombs?
Leftover Cherry Pie Bombs can be stored in an airtight container at room temperature for up to two days, or in the refrigerator for up to four days. Reheat them gently in a toaster oven or conventional oven for a few minutes to revive their crispness.
Cherry Pie Bombs
These delightful Cherry Pie Bombs are a quick and easy dessert, transforming flaky biscuits into crispy, sweet treats filled with cherry goodness and drizzled with a simple glaze.
Ingredients
-
Vegetable oil, for frying
-
16.3 ounces Grands “Big” biscuits, flaky
-
21 ounces cherry pie filling
-
2 cups powdered sugar
-
¼ cup milk
-
1 tablespoon light corn syrup
Instructions
-
Step 1
Open the Grands “Big” biscuits and separate them. Gently flatten each biscuit. -
Step 2
Spoon about 1-2 tablespoons of cherry pie filling into the center of each flattened biscuit. -
Step 3
Carefully bring the edges of the biscuit up and around the filling, pinching firmly to seal and form a ball. Ensure no filling is exposed. -
Step 4
Heat vegetable oil in a deep pot or Dutch oven to 350°F (175°C). Carefully place the cherry pie bombs into the hot oil, frying a few at a time until golden brown and puffed up, about 2-3 minutes per side. -
Step 5
Remove the fried bombs with a slotted spoon and place them on a paper towel-lined plate to drain excess oil. -
Step 6
While the bombs are still warm, whisk together the powdered sugar, milk, and light corn syrup in a small bowl until smooth to create the glaze. Adjust consistency with more milk or powdered sugar if needed. -
Step 7
Drizzle the glaze generously over the warm cherry pie bombs.
Important Information
Nutrition Facts (Per Serving)
It is important to consider this information as approximate and not to use it as definitive health advice.
Allergy Information
Please check ingredients for potential allergens and consult a health professional if in doubt.