Easy St-Patrick’s Day Cookies-Festive & Fun Recipes
Easy St. Patrick’s Day Cookies are the perfect way to inject a little festive fun into your kitchen without any fuss. As March rolls around, who doesn’t crave a touch of green and a sprinkle of luck? These delightful treats are a crowd-pleaser for a reason: they’re incredibly simple to make, meaning even novice bakers can whip up a batch and feel like culinary wizards. What truly makes these Easy St. Patrick’s Day Cookies special is their versatility. You can customize them with different frosting colors, edible glitter, or even fun St. Paddy’s-themed sprinkles. They’re ideal for sharing at parties, packing in lunchboxes for a cheerful surprise, or simply enjoying with a warm cup of tea as you embrace the spirit of the holiday. Get ready to spread some cheer, one delicious cookie at a time!
Easy St. Patrick’s Day Cookies
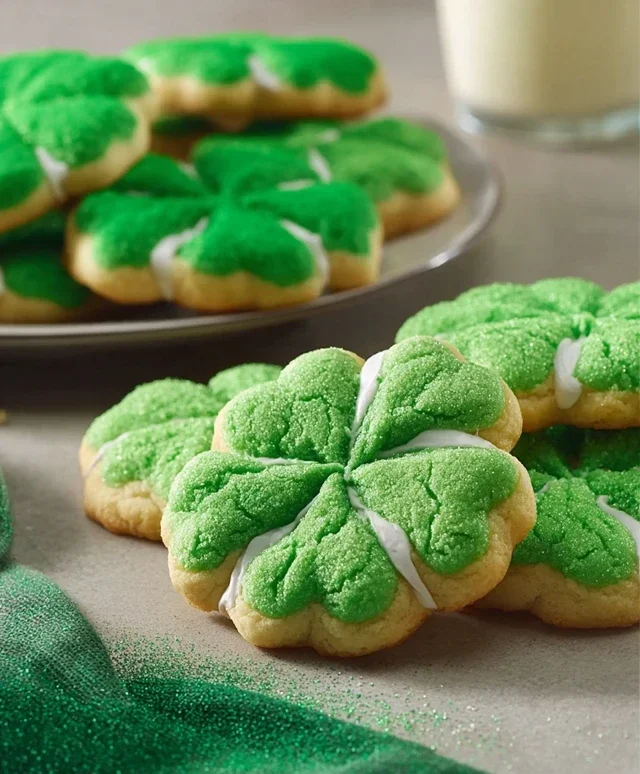
Looking for a quick and festive treat to celebrate St. Patrick’s Day? These easy green cookies are the perfect solution! Made with a simple white cake mix base, they come together in a flash and are guaranteed to bring a smile to your face (and everyone you share them with). No fancy decorating skills required, just a splash of green and a dash of sugar. Let’s get baking!
Ingredients:
Getting Started: Your Baking Prep
Before we dive into the mixing, let’s get everything ready. First, preheat your oven to 350°F (175°C). This ensures your cookies bake evenly and achieve that perfect golden edge. While the oven is preheating, line a couple of baking sheets with parchment paper. This is a lifesaver for easy cleanup and prevents your cookies from sticking, ensuring they slide right off the pan once baked. You can also use a silicone baking mat if you have one. Having your baking sheets prepped and ready to go means you can transfer the cookies to the oven immediately once they’re formed, preventing the dough from spreading too much.
Mixing the Dough: The Magic Begin extracts
In a large mixing bowl, combine the entire box of white cake mix, the 2 large eggs, and the 1/3 cup of vegetable oil. These are the foundational ingredients that will create a soft and tender cookie. Don’t be tempted to overmix at this stage; just mix until everything is just combined. A few streaks of dry cake mix are perfectly fine. Overmixing can develop the gluten in the flour too much, leading to tougher cookies, and we’re aiming for melt-in-your-mouth deliciousness!
Now comes the fun part – the color! Add the 1/4 teaspoon of Kelly green gel food coloring to the dough. Gel food coloring is excellent because it’s concentrated, meaning you get a vibrant color without adding too much extra liquid, which could alter the cookie’s texture. Start with the 1/4 teaspoon and mix thoroughly until the color is evenly distributed. You want a beautiful, festive green hue. If you desire an even deeper green, you can add another tiny drop of food coloring, but be cautious not to go overboard. Mix again until the color is uniform. The dough will look wonderfully festive and St. Patrick’s Day ready!
Forming and Baking Your Lucky Charms
Once your dough is a uniform green, it’s time to form the cookies. You can do this in a couple of ways. The easiest method for this recipe is to simply roll the dough into small balls. A tablespoon-sized portion works well, but you can adjust the size depending on your preference. Roll each portion between your palms until you have a smooth ball. Place these dough balls about 2 inches apart on your prepared baking sheets. They will spread slightly as they bake, so giving them a little breathing room is important to prevent them from mergin extractg into one giant cookie blob.
Now, for a little extra sparkle and texture. In a small, separate bowl, combine the 3 tablespoons of granulated sugar and the 6 tablespoons of powdered sugar. This sugar mixture will add a lovely crunch and sweetness to the exterior of your cookies. Gently roll each dough ball in this sugar mixture, ensuring it’s lightly coated all over. The granulated sugar provides a slight crisp, while the powdered sugar melts into a beautiful, subtle glaze during baking. This step also helps create a beautiful, slightly textured finish on your finished cookies.
Carefully place the baking sheets with your sugared dough balls into the preheated oven. Bake for 8 to 10 minutes. The exact baking time will depend on your oven and the size of your cookies. You’re looking for the edges to be lightly golden, and the centers to appear set but still slightly soft. They will continue to firm up as they cool. Avoid overbaking, as this will result in dry, hard cookies. Keep a close eye on them during the last few minutes of baking.
Cooling and Enjoying Your Festive Treats
Once baked, remove the baking sheets from the oven. Let the cookies cool on the baking sheets for about 5 minutes. This allows them to set up a bit before you try to move them, preventing them from breaking apart. After those 5 minutes, carefully transfer the cookies to a wire rack to cool completely. Cooling them on a wire rack allows air to circulate around them, ensuring they cool evenly and don’t become soggy on the bottom.
And there you have it! Beautiful, easy, and delicious green cookies perfect for St. Patrick’s Day. They are wonderfully simple to make, making them an ideal activity for kids or anyone who wants a quick festive bake. Enjoy these delightful treats with a glass of milk or a cup of tea. Happy St. Patrick’s Day!
Conclusion:
And there you have it! These Easy St. Patrick’s Day Cookies are a delightful and stress-free way to bring some festive cheer to your celebration. Their simple preparation makes them perfect for bakers of all skill levels, and the vibrant green color and fun decorations are sure to bring smiles to everyone’s faces. Whether you’re hosting a party, sending treats to friends, or simply want to enjoy a sweet, seasonal indulgence, these cookies are a guaranteed hit.
They are wonderful on their own, but also make a fantastic addition to any St. Patrick’s Day dessert table. Consider pairing them with a tall glass of milk, a cup of coffee, or even a creamy milkshake for an extra special treat. Don’t be afraid to get creative with the decorations! Beyond simple sprinkles, you could use green and white frosting to create sbeef hamrocks, gold coins, or even rainbow designs.
I truly encourage you to give these Easy St. Patrick’s Day Cookies a try. They are a simple pleasure that embodies the spirit of the holiday. Don’t worry if they aren’t perfect; the joy is in the making and sharing!
Frequently Asked Questions:
Can I make these cookies ahead of time?
Absolutely! These cookies can be baked and stored in an airtight container at room temperature for up to 3-4 days. Once cooled completely, you can decorate them or store them undecorated and frost them closer to St. Patrick’s Day.
What other green food coloring can I use besides gel?
While gel food coloring provides the most vibrant and concentrated green hue, you can also use liquid food coloring. You might need to use a bit more liquid coloring to achieve the same intensity, but be careful not to add too much as it could alter the cookie’s texture.
Are there any nut-free variations?
Yes! This recipe is naturally nut-free, assuming you are using nut-free ingredients like standard all-purpose flour and no nut extracts. Always double-check your ingredient labels to ensure they are free from any allergens you need to avoid.
Easy St. Patrick’s Day Cookies
Simple and festive green cookies perfect for St. Patrick’s Day celebrations.
Ingredients
-
1 box (15.25 oz) white cake mix (about 3 cups)
-
2 large eggs
-
1/3 cup vegetable oil
-
1/4 teaspoon Kelly green gel food coloring
-
3 tablespoons granulated sugar
-
6 tablespoons powdered sugar
Instructions
-
Step 1
Preheat oven to 350°F (175°C). Line baking sheets with parchment paper. -
Step 2
In a large bowl, combine the white cake mix, eggs, and vegetable oil. -
Step 3
Add the Kelly green gel food coloring and mix until thoroughly combined and the dough is a uniform green color. -
Step 4
Drop rounded tablespoons of dough onto the prepared baking sheets. -
Step 5
In a small bowl, mix the granulated sugar and powdered sugar. Roll each cookie dough ball in the sugar mixture until coated. -
Step 6
Bake for 8-10 minutes, or until the edges are lightly golden and the centers are set. -
Step 7
Let cookies cool on the baking sheets for a few minutes before transferring them to a wire rack to cool completely.
Important Information
Nutrition Facts (Per Serving)
It is important to consider this information as approximate and not to use it as definitive health advice.
Allergy Information
Please check ingredients for potential allergens and consult a health professional if in doubt.