Masoor Dal Chilla Savory Red Lentil Pancakes
Masoor Dal Chilla, those delightful savory red lentil pancakes, are an absolute staple in my kitchen, and for good reason! If you’re searching for a breakfast or brunch option that’s both incredibly healthy and bursting with flavor, look no further. These chillas are a revelation – light, subtly spiced, and wonderfully satisfying. What truly makes Masoor Dal Chilla so special is its inherent simplicity coupled with its remarkable nutritional profile. Red lentils, the star ingredient, are packed with protein and fiber, making these pancakes a fantastic way to start your day feeling energized and full. They’re naturally gluten-free and can be easily adapted to suit various dietary preferences, making them universally loved. I adore how versatile they are; you can serve them with a dollop of yogurt, a spicy chutney, or even just a squeeze of lime. Get ready to fall in love with this wholesome and delicious dish!
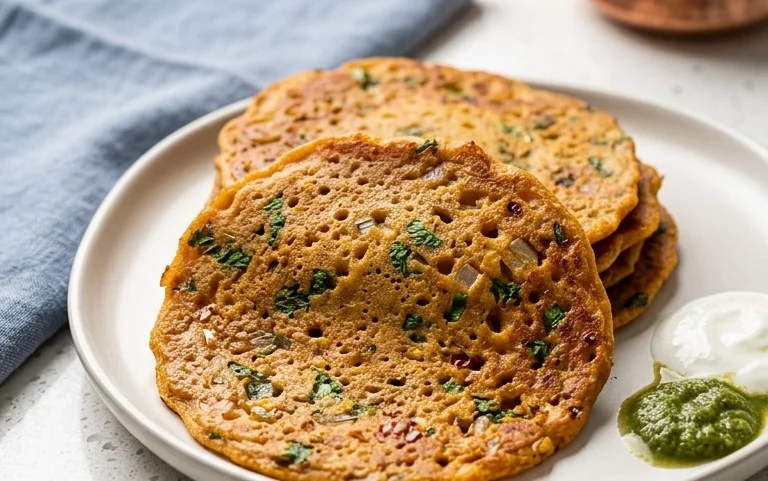
Masoor Dal Chilla | Savory Red Lentil Pancakes
Masoor Dal Chilla, or savory red lentil pancakes, is a dish that’s close to my heart. It’s a wonderfully versatile and nutritious option, perfect for breakfast, a light lunch, or even a wholesome snack. What I love most about chilla is its simplicity and the fact that it’s a fantastic way to sneak in some protein and fiber into your diet without even realizing it. The earthy flavor of red lentils, combined with the subtle kick of gin extractger and chili, makes for a truly satisfying bite. It’s incredibly easy to whip up, making it ideal for those busy mornings or when you’re craving something healthy and delicious with minimal fuss.
This recipe is naturally gluten-free and can easily be made vegan. It’s a staple in many Indian households for good reason – it’s nourishing, quick, and incredibly adaptable. You can customize it with your favorite vegetables and spices, making each batch a little bit unique. Let’s get started on creating these delightful savory pancakes!
Ingredients:
Cooking Instructions:
Step 1: Preparing the Lentils
The first crucial step in making delicious Masoor Dal Chilla is to properly prepare the red lentils. You’ll start by thoroughly rinsing the 1 cup of split red lentils under cold running water. It’s important to rinse them until the water runs clear. This removes any dust or impurities. Once rinsed, place the lentils in a bowl and cover them generously with 3 cups of water. Let them soak for at least 2 to 3 hours. For a smoother batter and easier grinding, I often let mine soak for up to 4 hours. If you’re short on time, you can even soak them in warm water for about an hour, but a longer soak in cold water generally yields better results. Soaking is essential as it softens the lentils, making them easier to grind into a smooth batter and also aids in their digestibility.
Step 2: Grinding the Batter
After the lentils have soaked, drain all the soaking water completely. Now it’s time to grind the lentils into a batter. Transfer the soaked lentils to a blender or food processor. To this, add the green chili (you can adjust the quantity based on your spice preference; I usually use one for a mild kick) and the 1-inch piece of gin extractger. You’ll also add the 1 teaspoon of kosher salt. Now, begin extract to grind, adding the ½ cup of water gradually. You want to achieve a smooth, thick, and pourable batter, similar in consistency to pancake batter. Be careful not to add too much water at once; you can always add more if needed. Aim for a consistency where the batter coats the back of a spoon but is not too thick that it won’t spread easily. If your blender is struggling, you can stop and scrape down the sides to ensure everything is getting ground evenly. Once you have a smooth batter, transfer it to a mixing bowl.
Step 3: Incorporating Flavor and Texture
Now that you have your smooth lentil batter, it’s time to add those lovely fresh flavors that will make your chilla sing. Gently fold in the 2 tablespoons of finely chopped cilantro. Cilantro adds a burst of freshness and a beautiful green fleck to the chilla. If you’re not a fan of cilantro, you can substitute it with finely chopped mint leaves or omit it altogether. Give the batter a good stir to ensure the cilantro is evenly distributed. At this stage, you can also taste the batter and adjust the salt if necessary. Remember, the batter is the base, and these additions elevate it from simple lentil paste to a flavorful dish.
Step 4: Cooking the Chillas
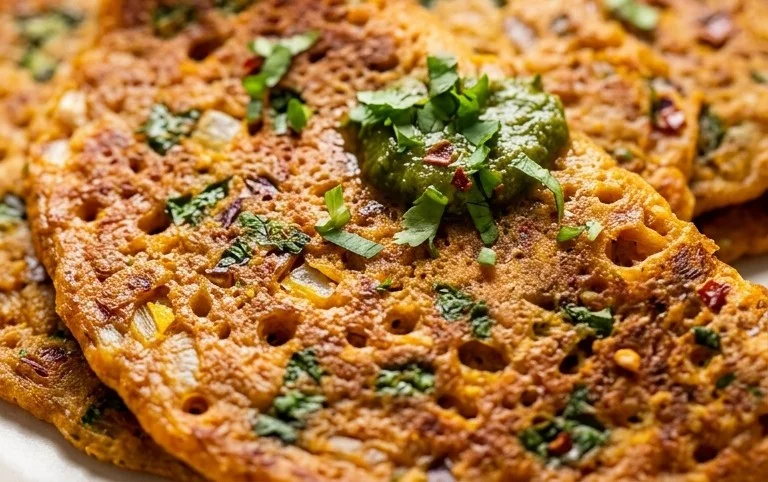
Heat a non-stick skillet or a well-seasoned cast-iron griddle over medium heat. Add about ½ tablespoon of oil and spread it evenly across the surface. Once the pan is hot, pour a ladleful of the batter onto the skillet. You can use the back of the ladle to gently spread the batter outwards in a circular motion to form a pancake of your desired thickness. I like mine to be about ¼ inch thick, but you can make them thinner for crispier edges. Cook for about 2 to 3 minutes on one side, or until you see small bubbles forming on the surface and the edges start to look slightly dry and golden brown. The key is to cook them on medium heat to ensure they cook through without burning.
Step 5: Flipping and Finishing
Once the underside is golden brown and the chilla is set, carefully slide a spatula underneath and flip it over. Add another ½ tablespoon of oil to the pan if needed. Cook the other side for another 2 to 3 minutes, or until it’s also golden brown and cooked through. You’ll know it’s done when the chilla is firm to the touch and has a lovely crispy texture. Repeat this process with the remaining batter, adding oil to the pan as needed between each chilla. You should be able to make about 4-5 chillas from this batter, depending on their size. Serve these hot and fresh for the best taste and texture.
These Masoor Dal Chillas are incredibly satisfying on their own, but they also pair wonderfully with a variety of accompaniments. I love serving them with a dollop of plain yogurt or a side of homemade mint-coriander chutney. For a more substantial meal, you can serve them with a simple vegetable stir-fry or some pickled onions. Enjoy your delicious and healthy homemade savory pancakes!
Conclusion:
And there you have it – your guide to making delicious Masoor Dal Chilla, or savory red lentil pancakes! I truly believe this recipe is a winner because it’s incredibly nutritious, packed with protein from the masoor dal, and delightfully versatile. It’s a fantastic option for a quick breakfast, a healthy lunch, or even a light dinner. The simple ingredients and straightforward preparation mean you can whip up a wholesome meal without much fuss. I encourage you all to give these Masoor Dal Chillas a try; you might just find your new go-to recipe!
When it comes to serving, the possibilities are endless. I love mine with a dollop of cooling yogurt or a spicy mint-coriander chutney. A side of sautéed vegetables or a fresh green salad makes it a complete meal. For variations, feel free to add finely chopped onions, tomatoes, green chilies, or even grated carrots and spinach to the batter for an extra burst of flavor and nutrition. You can also experiment with different spice blends; a pinch of garam masala or cumin powder can elevate the taste.
Frequently Asked Questions:
Q1: Can I make the Masoor Dal Chilla batter ahead of time?
Yes, absolutely! You can prepare the batter a day in advance and store it covered in the refrigerator. Just give it a good stir before cooking, as the dal may settle at the bottom. This makes busy mornings even easier.
Q2: What if I don’t have masoor dal? Can I use other lentils?
While masoor dal is ideal for its quick cooking and smooth texture, you can experiment with other red lentils like red masoor dal splits if that’s what you have. However, cooking times might vary, and the final texture might be slightly different. It’s always best to stick with masoor dal for the classic chilla experience.
Masoor Dal Chilla | Savory Red Lentil Pancakes
Delicious and healthy savory pancakes made from split red lentils, flavored with green chili and ginger.
Ingredients
-
1 cup split red lentils (masoor dal )
-
3 cups water (for soaking lentils )
-
1 green chilli
-
1 inch ginger
-
1 teaspoon kosher salt
-
½ cup water (for grinding )
-
2 tablespoons cilantro (finely chopped)
-
2 tablespoons oil
Instructions
-
Step 1
Rinse the masoor dal thoroughly and soak it in 3 cups of water for at least 2 hours or overnight. -
Step 2
Drain the soaked lentils completely. -
Step 3
In a blender, combine the drained lentils, green chilli, ginger, kosher salt, and ½ cup of water. Blend until you achieve a smooth batter. Adjust water if needed for a pouring consistency. -
Step 4
Stir in the finely chopped cilantro into the batter. -
Step 5
Heat 1 tablespoon of oil in a non-stick skillet or tawa over medium heat. -
Step 6
Pour a ladleful of batter onto the hot skillet and spread it gently in a circular motion to form a pancake. -
Step 7
Cook for 2-3 minutes until the edges start to brown and the surface bubbles. -
Step 8
Flip the chilla and cook the other side for another 2-3 minutes until golden brown and cooked through. -
Step 9
Repeat with the remaining batter, adding more oil as needed.
Important Information
Nutrition Facts (Per Serving)
It is important to consider this information as approximate and not to use it as definitive health advice.
Allergy Information
Please check ingredients for potential allergens and consult a health professional if in doubt.