Mini Red Velvet Oreo Cheesecakes Recipe
Mini Red Velvet Oreo Cheesecakes are the delightful answer to all your dessert cravings! Have you ever found yourself torn between the rich, fudgy goodness of red velvet and the classic, crum extractbly joy of Oreos? Now, you don’t have to choose! These individual masterpieces perfectly marry two beloved flavors into a show-stopping treat that’s as beautiful as it is delicious. People adore these mini red velvet Oreo cheesecakes because they offer an intensely satisfying bite without being overwhelming. The vibrant crimson hue of the red velvet batter, studded with crushed Oreos, creates a visually stunning contrast that promises an explosion of flavor with every forkful. What truly makes these mini red velvet Oreo cheesecakes special is their perfect portion size, making them ideal for parties, special occasions, or simply treating yourself to a moment of pure indulgence. Get ready to fall in love with this irresistible combination!
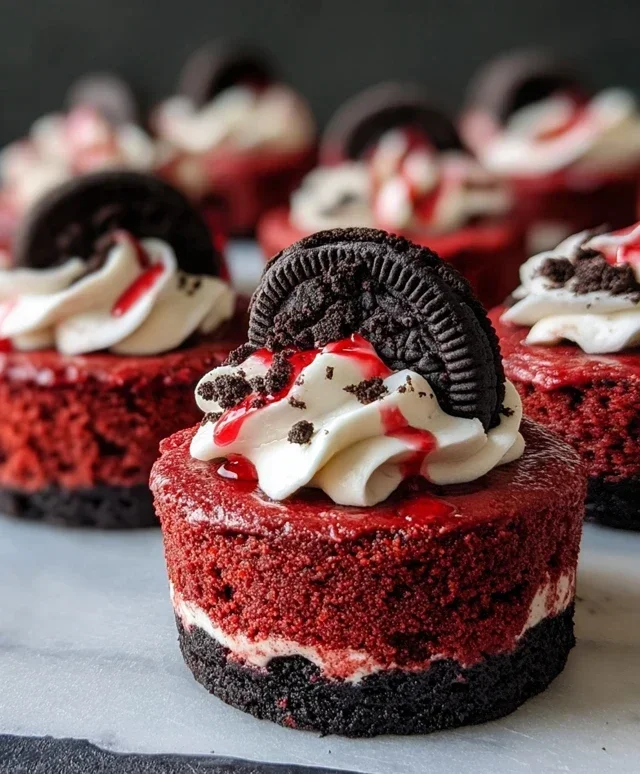
Mini Red Velvet Oreo Cheesecakes
There’s something undeniably special about a mini dessert. They’re perfectly portioned, endlessly cute, and often feel a little more indulgent. And when you combine the rich, decadent flavors of red velvet with the iconic crunch of Oreo cookies and the creamy delight of cheesecake, you get a truly show-stopping treat: Mini Red Velvet Oreo Cheesecakes! These little wonders are surprisingly easy to make and are sure to be a hit at any gathering, or just for a special treat for yourself. The vibrant red color, punctuated by dark chocolatey crum extractbles, makes them visually stunning, and the taste? Pure bliss. Let’s dive into creating these delightful mini cheesecakes.
Ingredients:
Instructions:
Preparing the Oreo Crust:
First, we need to create our delightful Oreo crusts. Take all 12 Oreo cookies and place them into a food processor. Pulse them until they form fine crum extractbs. If you don’t have a food processor, you can place the cookies in a zip-top bag and crush them with a rolling pin until they are finely ground. In a medium bowl, combine the Oreo crum extractbs with the 3 tablespoons of all-purpose flour, 1/2 cup of cocoa powder, 1/2 cup of granulated sugar, and a pinch of salt. Whisk these dry ingredients together to ensure they are well distributed. Now, pour in the 1/4 cup of melted unsalted butter and the 1 egg. Add the 1/2 teaspoon of vanilla extract. Stir everything together until it resembles wet sand and holds together when squeezed. This mixture will form the base of our mini cheesecakes.
Now it’s time to get these crusts into their molds. You’ll need a mini muffin tin for this. I like to lightly grease my mini muffin tin to prevent sticking, though mini paper liners can also be used if you prefer. Spoon about 1 tablespoon of the Oreo crust mixture into each of the mini muffin cups. Use the back of the spoon or your fingers to firmly press the crum extractbs down to form an even layer. This firm pressing is key to ensuring your crust doesn’t crum extractble apart when you serve the cheesecakes. Once pressed, place the muffin tin in the refrigerator for at least 15 minutes while you prepare the cheesecake filling. This chilling step helps the crust set up nicely.
Making the Red Velvet Cheesecake Filling:
-
12 Oreo cookies
-
1/4 cup unsalted butter, melted
-
8 oz cream cheese, room temperature
-
1 egg, room temperature
-
1/4 cup sour cream, room temperature
-
1/4 cup granulated sugar
-
1 tablespoon cocoa powder
-
1/2 teaspoon vanilla extract
-
Red gel food coloring
-
3 tablespoons all-purpose flour
-
1/2 cup cocoa powder
-
1/2 cup granulated sugar
-
1 egg, room temperature
-
1/2 teaspoon vanilla extract
-
Pinch of salt
-
Step 1
Crush the Oreo cookies into fine crumbs. In a bowl, combine the Oreo crumbs with the melted butter and mix until well combined. Press this mixture evenly into the bottoms of 12 mini muffin cups lined with paper liners. -
Step 2
In a separate bowl, beat the cream cheese until smooth. Gradually add the granulated sugar and beat until combined. Mix in the sour cream, then the egg, vanilla extract, and red gel food coloring until the batter is smooth and vibrantly colored. -
Step 3
For the red velvet cake batter: Whisk together the all-purpose flour, 1/2 cup cocoa powder, 1/2 cup granulated sugar, 1 egg, 1/2 teaspoon vanilla extract, and a pinch of salt until a smooth batter forms. Add a few drops of red gel food coloring to achieve a rich red hue. -
Step 4
Spoon about 1 tablespoon of the red velvet cake batter over each Oreo crust. Then, top with about 2 tablespoons of the cream cheese mixture, filling the muffin cups almost to the top. -
Step 5
Bake in a preheated oven at 325°F (160°C) for 18-20 minutes, or until the edges are set and the centers are just barely jiggly. Do not overbake. -
Step 6
Let the cheesecakes cool in the muffin tin for 10 minutes before carefully removing them to a wire rack to cool completely. Chill in the refrigerator for at least 2 hours before serving.
Let’s move on to the star of the show: the red velvet cheesecake filling. In a large bowl, beat the 8 oz of room-temperature cream cheese until it’s smooth and creamy. This is a crucial step to avoid any lumps in your cheesecake. Make sure your cream cheese is truly at room temperature – it makes a world of difference. Next, add the 1 egg (make sure it’s also at room temperature) and the 1/4 cup of sour cream. Beat these in until they are just combined. Be careful not to overmix at this stage, as it can introduce too much air, which can lead to cracks in your cheesecakes.
Now for the red velvet magic! In a separate small bowl, whisk together the 1/4 cup of granulated sugar and the 1 tablespoon of cocoa powder. Add this mixture to the cream cheese batter along with the 1/2 teaspoon of vanilla extract. Beat on low speed until everything is just combined. The color will be a beautiful chocolatey brown at this point. Now, it’s time to add our red gel food coloring. Start by adding a few drops of the red gel food coloring and mix it in thoroughly. Gel food coloring is more concentrated than liquid, so a little goes a long way. Continue adding the red coloring, a few drops at a time, mixing well after each addition, until you achieve your desired vibrant red velvet hue. You’re looking for a rich, deep red color that’s characteristic of red velvet.
Assembling and Baking:
With our crusts chilled and our filling ready, it’s time to assemble these beautiful mini cheesecakes. Retrieve your mini muffin tin from the refrigerator. Spoon or pipe the red velvet cheesecake filling evenly into each of the muffin cups, filling them almost to the top. Try to get the filling as level as possible for an even bake. A small spoon or a piping bag with a large round tip works wonderfully here. Once all the cups are filled, it’s time to bake. Preheat your oven to 325°F (160°C). Bake the mini cheesecakes for approximately 18-22 minutes, or until the edges are set and the centers are just slightly jiggly. They will continue to set as they cool. Avoid overbaking, as this can lead to a dry cheesecake.
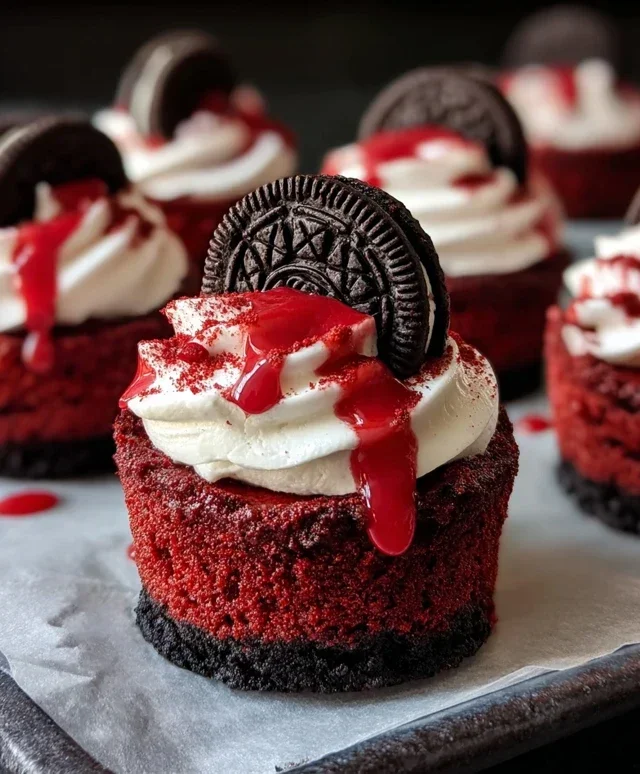
After baking, let the mini cheesecakes cool in the muffin tin for about 10-15 minutes before carefully removing them. You can gently loosen the edges with a thin knife or offset spatula if needed. Transfer them to a wire rack to cool completely. Once they’ve reached room temperature, it’s highly recommended to chill them in the refrigerator for at least 2-3 hours, or preferably overnight, to allow them to fully set and for the flavors to meld. This chilling process is essential for achieving that perfect cheesecake texture. Once chilled, you can serve them as is, or get creative with your toppings! A dollop of whipped cream, a drizzle of chocolate ganache, or even a mini Oreo on top would be divine. Enjoy these delightful bites of red velvet and Oreo heaven!
Conclusion:
There you have it – a delightful recipe for Mini Red Velvet Oreo Cheesecakes that’s sure to impress! These individual treats perfectly balance the rich, velvety texture of red velvet with the iconic crunch and flavor of Oreos. They’re surprisingly simple to make, making them an ideal choice for parties, holidays, or just a special dessert any day of the week. The individual portions make them incredibly convenient for serving and allow everyone to enjoy their own personal masterpiece. I truly encourage you to give these mini cheesecakes a try; you won’t regret the effort for the incredibly satisfying outcome.
When it comes to serving, these mini cheesecakes are fantastic on their own, but you can elevate them further with a dollop of whipped cream, a scattering of red velvet cake crum extractbs, or even a drizzle of chocolate ganache. For variations, consider adding a hint of espresso powder to the cheesecake filling for a mocha twist, or swirl in some white chocolate for extra decadence. You could also experiment with different cookie crusts, perhaps a chocolate grabeef ham cracker or even a chocolate chip cookie base. Get creative and make these Mini Red Velvet Oreo Cheesecakes your own!
Frequently Asked Questions:
Can I make these ahead of time?
Absolutely! These Mini Red Velvet Oreo Cheesecakes can be made up to 2 days in advance. Store them covered in the refrigerator. They are often even better the next day as the flavors meld together beautifully.
What if I don’t have mini cheesecake pans?
No worries! You can adapt this recipe using a standard muffin tin. Line the muffin tin with cupcake liners, then press the Oreo mixture into the bottom of each liner. The baking time might need slight adjustment, so keep an eye on them.
Mini Red Velvet Oreo Cheesecakes
Decadent mini cheesecakes with a red velvet-Oreo crust and a creamy, tangy filling. A perfect treat for any occasion.
Ingredients
Instructions
Important Information
Nutrition Facts (Per Serving)
It is important to consider this information as approximate and not to use it as definitive health advice.
Allergy Information
Please check ingredients for potential allergens and consult a health professional if in doubt.