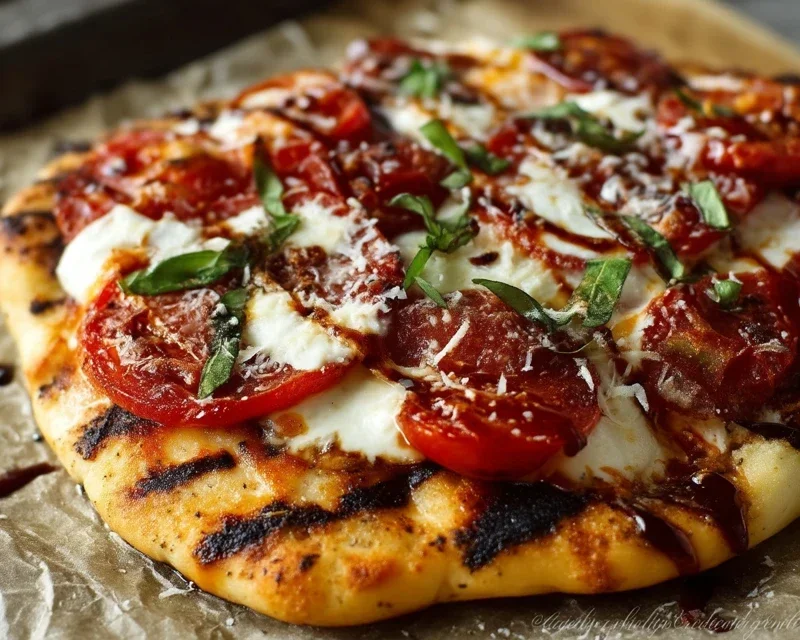
Perfect Grilled Pizza Recipe – Easy Steps
How to Make the Perfect Grilled Pizza is an adventure your taste buds will thank you for. Forget the delivery box and the soggy crust; we’re talking about creating a masterpiece right on your grill, a feat that sounds intimidating but is surprisingly achievable. There’s something inherently magical about grilled pizza. The smoky char from the grill, the blistered, airy crust, and the way the toppings meld together in that intense heat – it’s a sensory experience that’s simply unparalleled. This isn’t just dinner; it’s an event. Whether you’re a seasoned grill master or just looking to elevate your backyard cooking game, mastering the perfect grilled pizza will unlock a whole new world of delicious possibilities for your summer gatherings or even a cozy weeknight treat.
How to Make the Perfect Grilled Pizza
There’s something undeniably special about pizza. The melted cheese, the savory sauce, the satisfying crust – it’s a crowd-pleaser for a reason. But if you’ve only ever experienced oven-baked pizza, you’re missing out on a whole new level of deliciousness. Grilling pizza takes this classic dish to a new dimension, infusing it with a subtle smoky flavor and achieving a crispy, slightly charred crust that’s simply unparalleled. It might sound intimidating at first, but I promise you, with a few simple tricks, you’ll be making perfect grilled pizza that will impress everyone, including yourself.
The beauty of grilled pizza lies in its simplicity and the versatility it offers. You can go classic with marinara and mozzarella, or get adventurous with whatever toppings your heart desires. The high heat of the grill cooks the pizza quickly, resulting in a perfectly tender interior and a wonderfully crisp exterior. So, let’s gather our ingredients and get ready for some al fresco pizza perfection!
Ingredients:
Preparing Your Workspace and Grill
Before we even think about the dough, it’s crucial to get your grill ready. This isn’t like grilling a steak where you just crank up the heat. For pizza, you want a medium-high heat. This means preheating your grill for about 10-15 minutes. You’re aiming for a temperature of around 450-500°F (230-260°C). If you have a gas grill, this is easy to manage with your temperature gauge. For a charcoal grill, arrange your coals so there’s a hot zone and a slightly cooler zone. This is important because we’ll be cooking the dough directly on the grates, and we want a good sear without burning it to a crisp immediately.
While the grill is heating, make sure your grilling tools are within easy reach. You’ll want a sturdy spatula or pizza peel for transferring the pizza, a pair of long tongs for handling the dough, and maybe a pastry brush for applying olive oil. Have all your toppings prepped and ready to go. Chopping vegetables, slicing meats, and opening any cans should all be done before you start grilling, as the process is quite fast. Also, have a baking sheet or pizza peel dusted with cornmeal or flour ready to assemble your pizza on. This will prevent sticking.
Getting the Dough Ready
The foundation of any great pizza is its dough. For grilled pizza, you want a dough that’s pliable and can withstand the direct heat. If you’re using store-bought dough, let it come to room temperature for at least 30 minutes to an hour before you plan to grill. This makes it much easier to stretch and shape without it shrinking back. If you’re making your own, ensure it has had a good first rise.
The key to grilling pizza successfully is to par-cook the dough on one side before adding your toppings. This prevents the dough from becoming soggy from the sauce and toppings, and ensures a crispy base. We’ll start by lightly dusting your work surface with cornmeal or flour. Gently stretch or roll out your pizza dough into your desired shape, typically a circle or an oval, about 1/4-inch thick. Don’t aim for perfection here; a rustic shape is part of the charm of grilled pizza.
The Grilling Process – Step-by-Step
Now, let’s get to the fun part!
1. Prepare the Grill Grates: Once your grill is preheated, it’s essential to clean the grates thoroughly. Use a stiff wire brush to remove any old debris. Then, lightly oil the grates. You can do this by dipping a wadded-up paper towel in a high-heat oil (like canola or vegetable oil) and, using your tongs, carefully swipe it across the hot grates. This will help prevent the dough from sticking.
2. Grill the First Side of the Dough: Carefully transfer your stretched pizza dough directly onto the preheated grill grates. You should hear a satisfying sizzle. Close the grill lid and cook for about 2-4 minutes. Keep a close eye on it! You’re looking for the dough to puff up slightly and develop some nice char marks on the bottom. This is the par-cooking stage.
3. Flip and Brush with Olive Oil: Using your spatula or pizza peel, carefully flip the dough over. It should release easily if your grates are clean and oiled. Now, working quickly, brush the grilled side of the dough with a generous amount of olive oil. This oil will help create a barrier and add a wonderful richness to the crust as it finishes cooking.
4. Add Your Sauce and Toppings: Immediately after brushing with olive oil, spread your pizza sauce evenly over the grilled side of the dough, leaving about a 1/2-inch border for the crust. Then, sprinkle on your shredded mozzarella cheese, followed by your prepared toppings. Don’t overload the pizza, as this can make it difficult to cook evenly and might cause the crust to become soggy. A good rule of thumb is to use about 1.5 cups of cheese and a moderate amount of toppings.
5. Grill Until Done: Close the grill lid again and continue to cook for another 4-8 minutes, or until the cheese is melted and bubbly, and the crust is golden brown and crispy. The exact time will depend on your grill’s heat. You might want to rotate the pizza 180 degrees halfway through this stage to ensure even cooking, especially if your grill has hot spots. Peek under the crust occasionally to check for doneness and prevent burning.
Finishing Touches and Serving
Once your grilled pizza is cooked to perfection, carefully remove it from the grill using your spatula or pizza peel. Transfer it to a cutting board. At this point, you can add any fresh toppings that you prefer not to cook, such as fresh basil leaves, a drizzle of balsamic glaze, or a sprinkle of red pepper flakes for a little heat. Let the pizza rest for just a minute or two before slicing. This allows the cheese to set slightly, making it easier to cut. Slice it up and enjoy the incredible flavor and texture of your homemade grilled pizza! It’s a simple yet incredibly rewarding culinary adventure.
Conclusion:
You’ve now unlocked the secrets to making the perfect grilled pizza! This recipe isn’t just about a delicious meal; it’s about transforming your backyard into an al fresco pizzeria. The smoky char from the grill, combined with a perfectly cooked crust and your favorite toppings, creates an unforgettable flavor profile that simply can’t be replicated in a conventional oven. It’s a fantastic way to entertain, a fun family activity, and an incredibly satisfying culinary achievement. Don’t be afraid to get creative with your toppings – think beyond the classics! Consider a white pizza with ricotta and spinach, a spicy beef chorizo and corn combination, or even a sweet fig and beef prosciutto masterpiece. Serve your grilled pizza hot off the grates with a fresh arugula salad and a chilled beverage for an idyllic summer feast. I highly encourage you to try this method; the results will speak for themselves and have you ditching takeout for good!
Frequently Asked Questions:
Q1: What kind of grill is best for making grilled pizza?
A: You can achieve fantastic grilled pizza on both gas and charcoal grills. Gas grills offer more precise temperature control, which can be helpful for begin extractners. Charcoal grills, however, impart a wonderful smoky flavor. The key is to ensure you have a setup that allows for direct and indirect heat zones, so you can cook the crust without burning it before the toppings are ready.
Q2: My pizza crust is burning on the bottom but not cooked through. What did I do wrong?
A: This is a common issue when you’re first learning to make grilled pizza. It usually means your grill is too hot on the direct heat side. Try moving the pizza to a cooler part of the grill (indirect heat) after the initial searing of the dough. You can also pre-bake the crust for a minute or two on each side before adding your toppings. This ensures the dough cooks through evenly.
Q3: Can I make the pizza dough ahead of time?
A: Absolutely! Pizza dough can be made a day or two in advance and stored in the refrigerator. This allows the flavors to develop further, resulting in an even more delicious crust. Just be sure to bring it to room temperature for about 30-60 minutes before you plan to grill it for the best texture.
Perfect Grilled Pizza
Master the art of smoky, crispy grilled pizza with this easy-to-follow recipe. A delightful outdoor cooking experience.
Ingredients
-
2 cups all-purpose flour
-
1 teaspoon active dry yeast
-
1 teaspoon salt
-
2 tablespoons olive oil, plus more for brushing
-
3/4 cup warm water
-
1/2 cup tomato sauce
-
8 ounces shredded mozzarella cheese
-
1/4 cup sliced pepperoni
-
1/4 cup sliced mushrooms
Instructions
-
Step 1
In a large bowl, combine flour, yeast, and salt. Gradually stir in warm water and olive oil until a shaggy dough forms. -
Step 2
Turn dough onto a lightly floured surface and knead for 5-7 minutes until smooth and elastic. Place in a lightly oiled bowl, cover, and let rise in a warm place for 30-60 minutes, or until doubled in size. -
Step 3
Preheat your grill to medium-high heat (around 400-450°F or 200-230°C). Brush grill grates with oil. -
Step 4
Divide dough in half. On a lightly floured surface, stretch or roll each half into a roughly 10-12 inch circle. -
Step 5
Carefully place one dough circle onto the preheated grill. Grill for 2-3 minutes per side, until lightly golden and puffed. -
Step 6
Remove dough from grill. Spread with tomato sauce, top with mozzarella cheese, pepperoni, and mushrooms. Drizzle with a little olive oil. -
Step 7
Return pizza to the grill, close lid, and cook for another 4-6 minutes, or until cheese is melted and bubbly, and crust is golden brown. -
Step 8
Repeat with the second pizza. Let cool slightly before slicing and serving.
Important Information
Nutrition Facts (Per Serving)
It is important to consider this information as approximate and not to use it as definitive health advice.
Allergy Information
Please check ingredients for potential allergens and consult a health professional if in doubt.