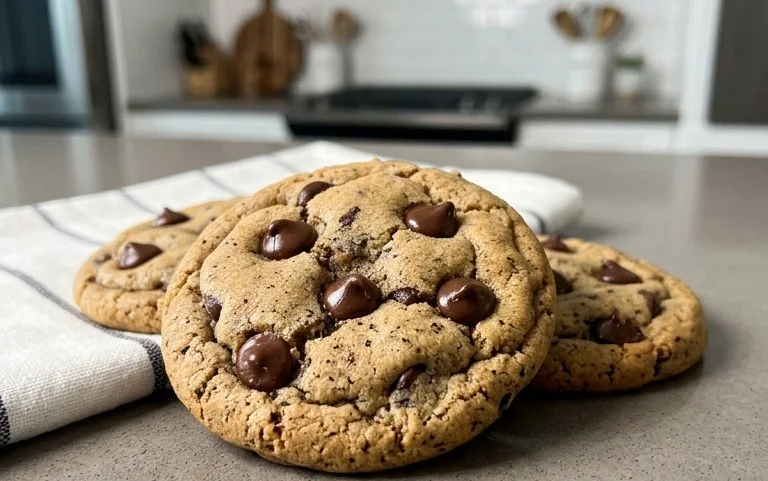
Rich Espresso Chocolate Chip Cookies – Deliciously Bold
Espresso Chocolate Chip Cookies are not just cookies; they are an experience. Forget your average chocolate chip cookie; we’re talking about a decadent upgrade that will have your taste buds singin extractg. Why do we crave this particular twist on a classic? Because the subtle, yet powerful, coffee undertones elevate the familiar comfort of chocolate chips into something truly extraordinary. It’s that perfect marriage of bold espresso and sweet, melty chocolate that makes these Espresso Chocolate Chip Cookies so utterly irresistible. Imagin extracte the aroma wafting from your oven, a promise of rich, chewy centers and slightly crisp edges, all infused with that signature coffee kick. These aren’t your grandma’s chocolate chip cookies, though they’ll likely become a new family favorite!
The Secret to Irresistible Espresso Chocolate Chip Cookies
Unlock the rich, coffee-infused magic.
The Ultimate Espresso Chocolate Chip Cookies
There are chocolate chip cookies, and then there are espresso chocolate chip cookies. If you’re a coffee lover like me, you know that the subtle bitterness and deep aroma of espresso can elevate a classic treat into something truly extraordinary. These cookies are my go-to for a reason. They strike that perfect balance: a chewy center with slightly crisp edges, bursts of rich chocolate, and a sophisticated coffee undertone that will make you question all other chocolate chip cookies you’ve ever eaten. They are surprisingly easy to make, requiring just a bit of patience and a good sense of smell as the aroma fills your kitchen. Get ready to impress yourself and anyone lucky enough to snag one of these delicious creations.
Ingredients:
Instructions:
Phase 1: Creaming the Butter and Sugars
The foundation of any great cookie is the creaming process. In a large mixing bowl, I like to start by creaming together the softened unsalted butter, packed light brown sugar, and granulated sugar. Using softened butter, not melted, is crucial here. It should be pliable enough that you can easily indent it with your finger, but not so soft that it’s greasy. This allows the butter to incorporate air, which contributes to the cookie’s texture and lift. Creaming means beating these ingredients together until they are light and fluffy. This process can take about 3-5 minutes with an electric mixer, or a bit longer if you’re using a whisk and some elbow grease. You want to see the mixture turn a pnon-alcoholic ale yellow and become noticeably airy. This step is also where we introduce the star of our coffee show: the ground espresso. Make sure your espresso is finely ground; if it’s too coarse, it can create an unpleasant gritty texture in your finished cookie. Whisk it thoroughly into the butter and sugar mixture to ensure even distribution of that wonderful coffee flavor.
Phase 2: Incorporating Wet Ingredients
Once your butter, sugars, and espresso are perfectly creamed, it’s time to add the eggs and vanilla. I always make sure my eggs are at room temperature. This helps them emulsify better with the fat, leading to a smoother dough and preventing the butter from seizing up. If your eggs are cold, you can quickly warm them by placing them in a bowl of warm water for about 5-10 minutes. Beat in the room temperature large egg, followed by the room temperature egg yolk. The extra yolk adds richness and chegrape juicess to the cookies, making them wonderfully decadent. After each egg is incorporated, beat until just combined. Don’t overmix at this stage. Finally, stir in the vanilla extract. The vanilla complements the coffee and chocolate flavors beautifully, adding a layer of warm sweetness.
Phase 3: The Dry Ingredients and Flour Measurement
Now, let’s address the dry ingredients. In a separate medium bowl, whisk together the all-purpose flour, baking soda, and salt. Whisking these ingredients ensures they are evenly distributed, which prevents pockets of baking soda (which can lead to a metallic taste) or salt. Baking soda is our leavening agent, responsible for the cookie’s rise and spread. Salt balances the sweetness and enhances all the other flavors. A crucial note on measuring flour: I highly recommend the “spoon and level” method. This means gently spooning the flour into your measuring cup until it’s overflowing, and then using the back of a knife or a straight edge to level off the excess. Scooping directly from the bag can pack too much flour into the cup, resulting in dry, dense cookies. For these cookies, we need 1 2/3 cup plus 1 tablespoon of flour.
Phase 4: Combining Wet and Dry and Adding Chocolate
Now for the exciting part – bringin extractg everything together! Gradually add the dry ingredients to the wet ingredients. Mix on low speed or stir with a spatula until just combined. It’s very important not to overmix the dough at this stage. Overmixing develops the gluten in the flour, which can lead to tough cookies. You want to mix until you no longer see streaks of dry flour. A few small lumps are perfectly fine. Once the dough is almost fully combined, it’s time to fold in the chocolate. I love using a mix of chopped semi-sweet chocolate and mini chocolate chips. The chopped chocolate melts into gooey pockets, while the mini chips distribute more evenly throughout the cookie. Gently fold them in with a spatula until they are evenly distributed.
Phase 5: Chilling and Baking for Perfection
This is arguably the most important step for achieving that perfect cookie texture. Cover the bowl with plastic wrap and refrigerate the dough for at least 30 minutes, or preferably 2-3 hours. Chilling the dough allows the flavors to meld, the fats to solidify (which prevents excessive spreading), and the flour to hydrate, all contributing to a chewier, more flavorful cookie with a better texture. When you’re ready to bake, preheat your oven to 375°F (190°C) and line baking sheets with parchment paper. Parchment paper makes for easy cleanup and prevents sticking. Scoop rounded tablespoons of dough onto the prepared baking sheets, leaving about 2 inches between them to allow for spread. For those who like a perfectly flat cookie, you can gently press down on the tops with the palm of your hand. Bake for 9-12 minutes, or until the edges are lightly golden brown and the centers still look slightly underbaked. They will continue to set up as they cool on the baking sheet for a few minutes before being transferred to a wire rack to cool completely. The aroma that fills your kitchen during this process is simply divine! Enjoy!

Conclusion:
And there you have it – the ultimate guide to creating perfect Espresso Chocolate Chip Cookies! This recipe is a guaranteed winner because it strikes a delightful balance. The rich, slightly bitter notes of espresso elevate the classic chocolate chip cookie experience, transforming it into something truly special. The result is a cookie that’s wonderfully chewy in the center with delightfully crisp edges, packed with the irresistible combination of coffee and chocolate. I truly encourage you to give these a try; they’re surprisingly easy to make and the aroma filling your kitchen will be divine.
These Espresso Chocolate Chip Cookies are incredibly versatile. They’re fantastic served warm with a cold glass of milk, but they also pair beautifully with a hot latte or a strong black coffee for a double dose of caffeine goodness. For a truly decadent treat, crum extractble them over ice cream or use them as a base for an ice cream sandwich. Feel free to experiment with different types of chocolate – dark, milk, or even white chocolate chips all work wonderfully. You could also add a pinch of sea salt on top before baking for an extra flavor dimension.
Frequently Asked Questions:
Can I use instant coffee granules instead of espresso powder?
Yes, you absolutely can! If you don’t have espresso powder, you can substitute it with instant coffee granules. For the best flavor, dissolve about 1-2 teaspoons of instant coffee in the tablespoon of hot water called for in the recipe. Adjust the amount based on your preference for coffee intensity.
My cookies spread too much. How can I prevent this?
Cookie spread can be tricky! A few things might be happening. Ensure your butter is softened but not melted – if it’s too soft, the cookies will spread. Chilling the dough for at least 30 minutes before baking can also significantly help prevent excessive spreading. Making sure your oven temperature is accurate is also key; an oven that’s too hot can cause them to brown too quickly before they set.
Can I make these cookies ahead of time?
Certainly! You can prepare the dough and then store it in the refrigerator for up to 3 days. This actually allows the flavors to meld even further, resulting in an even more delicious cookie. You can also freeze the dough balls on a baking sheet until solid, then transfer them to a freezer-safe bag for up to 2-3 months. Just bake them from frozen, adding a couple of extra minutes to the baking time.
Espresso Chocolate Chip Cookies
A classic chocolate chip cookie recipe infused with the rich flavor of espresso for a delightful twist.
Ingredients
-
14 tablespoons unsalted butter
-
1 tablespoon ground espresso
-
1/2 cup + 2 tablespoons light brown sugar
-
1/2 cup granulated sugar
-
1 large egg (room temperature)
-
1 large egg yolk (room temperature)
-
2 teaspoon vanilla extract
-
1 2/3 cup + 1 tablespoon all-purpose flour
-
1 teaspoon baking soda
-
1 teaspoon salt
-
3/4 cup chopped semi-sweet chocolate or mini chocolate chips
Instructions
-
Step 1
In a large bowl, cream together the softened unsalted butter, ground espresso, light brown sugar, and granulated sugar until light and fluffy. -
Step 2
Beat in the room temperature egg, egg yolk, and vanilla extract until well combined. -
Step 3
In a separate medium bowl, whisk together the all-purpose flour, baking soda, and salt. -
Step 4
Gradually add the dry ingredients to the wet ingredients, mixing on low speed until just combined. Do not overmix. -
Step 5
Stir in the chopped semi-sweet chocolate or mini chocolate chips. -
Step 6
Drop rounded tablespoons of dough onto baking sheets lined with parchment paper, about 2 inches apart. -
Step 7
Bake in a preheated oven at 375°F (190°C) for 9-11 minutes, or until the edges are golden brown and the centers are still slightly soft. -
Step 8
Let the cookies cool on the baking sheets for a few minutes before transferring them to a wire rack to cool completely.
Important Information
Nutrition Facts (Per Serving)
It is important to consider this information as approximate and not to use it as definitive health advice.
Allergy Information
Please check ingredients for potential allergens and consult a health professional if in doubt.