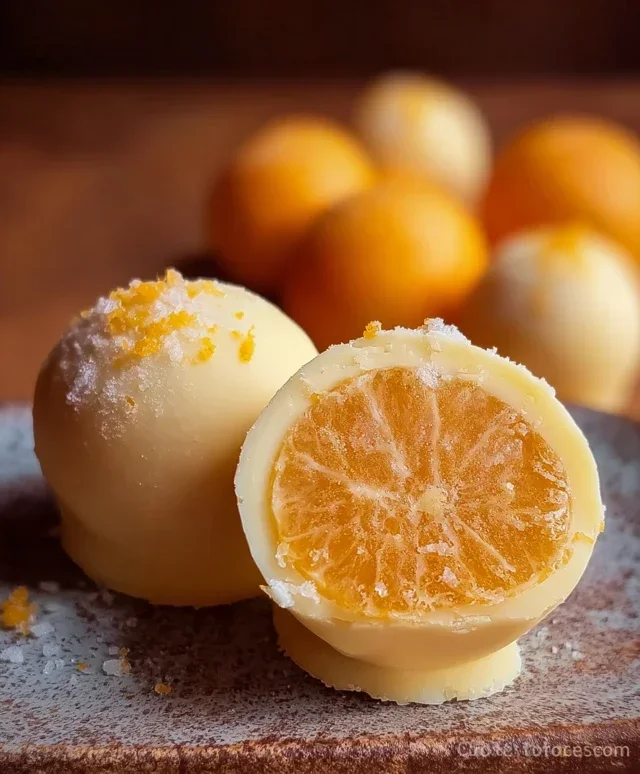
White Chocolate Orange Creamsicle Truffles Easy Recipe
White Chocolate Orange Creamsicle Truffles are pure bliss in every bite, a nostalgic trip back to childhood summers reimagin extracted into an elegant treat. If you’ve ever craved that iconic blend of creamy vanilla and zesty orange, then these White Chocolate Orange Creamsicle Truffles are destined to become your new favorite indulgence. They capture the essence of the beloved frozen treat, transforming it into a decadent, melt-in-your-mouth confection that’s surprisingly simple to create. What makes them truly special is the harmonious marriage of sweet white chocolate coating the creamy, citrus-infused center. Each truffle is a little orb of sunshine, perfect for parties, thoughtful gifts, or simply treating yourself to something truly delightful. Get ready to fall in love with the irresistible charm of these White Chocolate Orange Creamsicle Truffles!
White Chocolate Orange Creamsicle Truffles
Get ready to delight your taste buds with these White Chocolate Orange Creamsicle Truffles! Imagin extracte the nostalgic, creamy sweetness of a Creamsicle, but transformed into a decadent, bite-sized indulgence. These truffles are surprisingly easy to make and are perfect for special occasions, holidays, or just because you deserve a treat. The combination of smooth white chocolate and bright, zesty orange is simply irresistible. I’ve always been a huge fan of the classic Creamsicle flavor, and I wanted to capture that essence in a more sophisticated, yet still fun, dessert. These truffles are the perfect way to do just that! They’re melt-in-your-mouth delicious and look so beautiful when presented.
Ingredients:
Instructions:
To begin extract crafting these delightful truffles, let’s gather our ingredients and get our workspace ready. It’s important to chop the white chocolate into small, uniform pieces. This ensures that it melts evenly and smoothly, preventing any clumps. I like to use a good quality white chocolate for the best flavor and texture. If you can’t find chopped white chocolate, a bar of white chocolate will work perfectly, just make sure to chop it finely.
Melting the White Chocolate Base
1. In a medium, heatproof bowl, combine the chopped white chocolate, unsalted butter, and heavy cream. You’ll want to create a double boiler setup for this. Place the bowl over a saucepan filled with about an inch of simmering water. Make sure the bottom of the bowl doesn’t touch the water. Stir the mixture gently and continuously with a rubber spatula or wooden spoon until all the chocolate and butter are completely melted and the mixture is smooth and glossy. This slow and gentle melting process is crucial for white chocolate as it can scorch easily. Be patient, and you’ll be rewarded with a beautiful, fluid base for our truffles. Once melted, remove the bowl from the heat.
2. Now, it’s time to infuse our white chocolate ganache with that signature Creamsicle flavor. Add the pinch of salt to the melted chocolate mixture. The salt might seem a little odd in a sweet treat, but it actually helps to balance the sweetness and enhance all the other flavors, making them pop. Next, carefully stir in the 1 teaspoon of orange extract. Start with the recommended amount, and if you’re feeling brave and love a strong orange flavor, you can always add a tiny bit more, but be cautious as too much can make it taste artificial. If you’re using food coloring, now is the time to add it. For a classic Creamsicle look, a few drops of orange food coloring will give it a lovely pastel hue. Alternatively, you can swirl in a bit of red and yellow food coloring to create a marbled effect, mimicking the swirls of the ice cream. Stir until the color is evenly distributed or you achieve your desired marbling.
Chilling and Shaping the Truffles
3. Once your ganache is smooth, fragrant, and beautifully colored, it’s time to let it chill and firm up. Pour the mixture into a shallow dish or a clean bowl. Cover it tightly with plastic wrap, pressing the wrap directly onto the surface of the ganache to prevent a skin from forming. Place the dish in the refrigerator for at least 2-3 hours, or until the mixture is firm enough to scoop and roll into balls. The colder it gets, the easier it will be to handle. You want it to be firm but not so hard that it becomes difficult to scoop. If it’s too soft, it will be sticky and messy to work with.
4. After the ganache has chilled sufficiently, it’s time to get your hands a little messy – in the best way possible! Line a baking sheet with parchment paper. Scoop out portions of the chilled ganache using a small cookie scoop or a teaspoon. Work quickly with the ganache as it will soften with the warmth of your hands. Roll each portion into a smooth, bite-sized ball. If the mixture starts to get too soft and sticky, pop it back into the refrigerator for a few minutes to firm up again. Don’t worry if your truffle balls aren’t perfectly round; a slightly rustic look can be charming! For this recipe, I’m rolling them into balls, but you could also experiment with other shapes if you feel artistic!
Finishing Touches and Enjoyment
5. Once all your truffles are rolled into balls, you have a few options for finishing them. For a simple and elegant finish, you can lightly dust them with the 1/3 cup of powdered sugar. You can do this by placing the powdered sugar in a shallow bowl and gently rolling the truffle balls in it until they are evenly coated. This gives them a beautiful, frosty appearance that’s reminiscent of a powdered doughnut or, you guessed it, a Creamsicle! Alternatively, you can melt more white chocolate and dip the truffles, letting the excess drip off before placing them on the parchment-lined baking sheet to set. For an extra pop of flavor and visual appeal, you could even add a tiny bit of orange zest to the powdered sugar dusting. Once finished, you can enjoy these delectable White Chocolate Orange Creamsicle Truffles immediately, or store them in an airtight container in the refrigerator for up to a week. They are best served at room temperature for the ultimate creamy texture. Enjoy every delightful bite!

Conclusion:
These White Chocolate Orange Creamsicle Truffles are an absolute triumph of flavor and texture! They’re incredibly easy to make, requiring no fancy equipment, and deliver a sophisticated yet nostalgic taste of summer. The creamy, smooth white chocolate perfectly complements the bright, zesty orange, evoking those beloved Creamsicle vibes in every delightful bite. They are the perfect sweet treat for a special occasion, a thoughtful homemade gift, or simply a way to brighten your day. I love serving them chilled, alongside a cup of coffee or tea, or as a sweet ending to a dinner party. They also make for a beautiful addition to a dessert platter, offering a unique and memorable option.
Feel adventurous? You can easily customize these truffles. Consider adding a pinch of cardamom for a warm spice note, or a splash of Grand Marnier Extract to the white chocolate mixture for an extra grown-up kick. Don’t be afraid to experiment with different coatings too – crushed pistachios or toasted coconut would be divine! I truly encourage you to give this White Chocolate Orange Creamsicle Truffles recipe a try. You’ll be amazed at how simple it is to create such a decadent and delicious confection that is sure to impress.
Frequently Asked Questions:
Can I make these truffles ahead of time?
Absolutely! These White Chocolate Orange Creamsicle Truffles are perfect for making in advance. Once rolled and coated, store them in an airtight container in the refrigerator for up to a week. They taste even better when the flavors have had a chance to meld!
What’s the best way to store leftover truffles?
For the best texture and flavor, store any leftover truffles in an airtight container in the refrigerator. They will firm up nicely. If you prefer a softer truffle, let them sit at room temperature for about 10-15 minutes before enjoying.
White Chocolate Orange Creamsicle Truffles
Decadent white chocolate truffles infused with the nostalgic flavors of orange and cream, mimicking the beloved Creamsicle.
Ingredients
-
8 oz. white chocolate, chopped into small pieces
-
5 tablespoons unsalted butter
-
3 tablespoons heavy cream
-
Pinch of salt
-
1 teaspoon orange extract
-
1/3 cup powdered sugar
Instructions
-
Step 1
In a heatproof bowl set over a saucepan of simmering water (double boiler method), melt the white chocolate and unsalted butter, stirring until smooth. -
Step 2
Remove from heat and stir in the heavy cream, pinch of salt, and orange extract until well combined and smooth. -
Step 3
If using food coloring, add a few drops and stir until the desired Creamsicle-like color is achieved. This is optional. -
Step 4
Cover the bowl and refrigerate for at least 30 minutes, or until firm enough to roll into balls. -
Step 5
Spoon out small portions of the mixture and roll into 1-inch balls. If the mixture becomes too soft, refrigerate again. -
Step 6
Roll each truffle in powdered sugar until evenly coated. Allow to set slightly before serving or storing.
Important Information
Nutrition Facts (Per Serving)
It is important to consider this information as approximate and not to use it as definitive health advice.
Allergy Information
Please check ingredients for potential allergens and consult a health professional if in doubt.