Easy Cherry Cheesecake Hand Pies-Delicious Treat
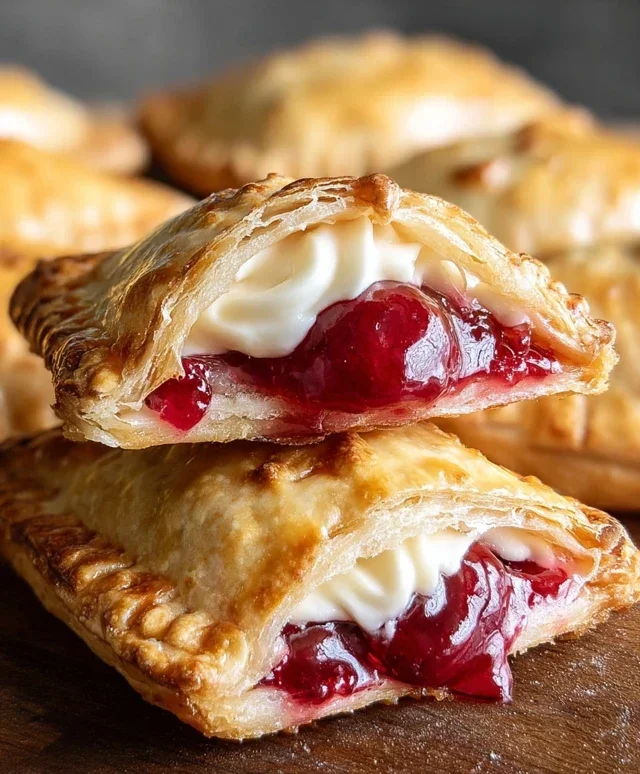
Cherry Cheesecake Hand Pies are the ultimate portable indulgence, a delightful explosion of sweet and tangy flavors wrapped in flaky, buttery pastry. Who doesn’t love the creamy, dreamy goodness of cheesecake? And when you pair that with the burst of juicy cherries, it’s a match made in dessert heaven. These cherry cheesecake hand pies take all those beloved elements and miniaturize them into perfectly portioned pockets of pure joy. They’re incredibly satisfying without being overwhelming, making them ideal for picnics, parties, or just a special treat after a long day. What makes these cherry cheesecake hand pies truly special is their versatility; they’re as delightful served warm, with a little extra melted cherry filling oozing out, as they are chilled, offering a refreshing bite. Imagin extracte the smiles you’ll bring when you present these adorable, flavorful treats!

Cherry Cheesecake Hand Pies
There’s something undeniably charming about a hand pie. These portable pockets of deliciousness are perfect for any occasion, whether you’re looking for a sweet treat to enjoy with your afternoon coffee, a fun dessert for a party, or even a special breakfast. And when you combine the creamy tang of cheesecake with the sweet burst of cherries, all encased in a flaky, golden crust, you’ve got a winner. These Cherry Cheesecake Hand Pies are surprisingly simple to make, especially with the help of refrigerated pie crusts. They’re an absolute crowd-pleaser, and the aroma that fills your kitchen as they bake (or fry!) is simply divine. Let’s get started on creating these delightful little hand pies.
Ingredients:
Preparing the Filling
The heart of these hand pies is the luscious cheesecake and cherry filling. Start by ensuring your cream cheese is properly softened. This means taking it out of the refrigerator about an hour before you plan to start mixing. Softened cream cheese will blend smoothly without lumps, creating a creamy base for our filling. In a medium bowl, combine the softened cream cheese with the 1/4 cup of granulated sugar. Use a whisk or an electric mixer on low speed to beat them together until the mixture is smooth and well combined. Don’t overmix; just until you no longer see streaks of cream cheese or sugar. Next, gently fold in the entire 21 oz can of cherry pie filling. You want to mix it in just enough to distribute the cherries and sauce throughout the cream cheese mixture, but avoid breaking up the cherries too much if you prefer distinct pieces. This filling should be thick enough to hold its shape within the pie crusts.
Assembling the Hand Pies
Now comes the fun part: assembling our individual hand pies. Unroll your package of refrigerated pie crusts onto a lightly floured surface. Since the package contains two crusts, you’ll have enough for about 8-10 hand pies, depending on how large you cut them. Use a round cookie cutter or a small bowl to cut out circles from each crust. Aim for circles about 4-5 inches in diameter. You can reroll the scraps of dough once, but be careful not to overwork them, as this can make the crust tough. For each hand pie, you’ll need two circles of dough. Place one circle onto a baking sheet lined with parchment paper. Spoon about 2-3 tablespoons of the cherry cheesecake filling onto the center of this bottom crust circle, leaving about a 1/2 inch border clear around the edge. This border is crucial for sealing the pies and preventing the filling from leaking out during cooking.
Sealing the Hand Pies
Once you have your filling neatly placed on the bottom crust, it’s time to seal them up. Take the second circle of pie crust and lay it gently over the filling. Now, press the edges of the two crusts together to seal them. You can do this by simply pressing with your fingers, but for a more secure seal and a decorative touch, use the tines of a fork to crimp the edges all the way around. This not only looks great but also ensures that your delicious filling stays inside. If you notice any small tears in the dough, you can pinch them closed. Once all your hand pies are assembled and senon-alcoholic aled, you can place them back on the parchment-lined baking sheet. At this point, you can either bake them or prepare them for frying.
Cooking the Hand Pies
For a slightly healthier, yet still delicious, option, you can bake these hand pies. Preheat your oven to 375°F (190°C). Before baking, you can optionally brush the tops of the hand pies with a little egg wash (one egg beaten with a tablespoon of water) and sprinkle with a bit of coarse sugar for a nice sheen and extra crunch. Bake for 20-25 minutes, or until the crust is golden brown and the filling is bubbly.
However, for that irresistible crispy, golden exterior that truly elevates a hand pie, deep frying is the way to go. In a deep, heavy-bottomed pot or Dutch oven, pour in your vegetable oil. You’ll want enough oil so that the hand pies can float freely without touching the bottom of the pot. Heat the oil to 350°F (175°C). This temperature is crucial; too hot and the outside will burn before the inside is heated through, and too cool and the crust will absorb too much oil. Carefully slide 2-3 hand pies at a time into the hot oil, being careful not to overcrowd the pot. Fry for 2-3 minutes per side, or until they are a beautiful golden brown. Use a slotted spoon or spider strainer to remove the fried hand pies and place them on a wire rack set over a baking sheet to drain any excess oil. This allows air to circulate, keeping the bottoms from becoming soggy.
Making the Glaze and Serving
While your hand pies are still warm, it’s time to add a sweet finishing touch. In a small bowl, whisk together the 1/2 cup of powdered sugar, 1 teaspoon of corn syrup, and 1 tablespoon of water until smooth and drizzly. The corn syrup adds a lovely shine and helps the glaze set slightly. Drizzle this simple glaze over the warm hand pies. The warmth will help the glaze melt slightly and adhere beautifully. Allow the glaze to set for a few minutes before serving. These Cherry Cheesecake Hand Pies are best enjoyed warm, when the crust is perfectly crisp and the filling is gooey and delightful. They are a wonderful treat that is sure to impress. Enjoy every bite!
Conclusion:
I truly hope you’ve enjoyed learning how to make these delightful Cherry Cheesecake Hand Pies! They are a fantastic treat because they combine the rich, creamy goodness of cheesecake with the vibrant, sweet-tart burst of cherries, all encased in a perfectly flaky pastry. The convenience of individual portions makes them ideal for parties, picnics, or simply a special dessert for yourself. Their portable nature means you can enjoy this gourmet flavor wherever you go!
For serving, I love them slightly warm, perhaps with a dollop of whipped cream or a drizzle of extra cherry sauce. They also stand beautifully on their own. If you’re feeling adventurous, consider swapping the cherries for another berry like blueberries or raspberries. A touch of almond extract in the cheesecake filling can also add a wonderful, unexpected depth of flavor to your Cherry Cheesecake Hand Pies.
I wholeheartedly encourage you to give this recipe a try. It’s surprisingly easy to achieve impressive results, and the joy on your friends’ and family’s faces when they bite into these homemade treasures will be absolutely worth it. Happy baking!
Frequently Asked Questions:
Can I make these hand pies ahead of time?
Yes! You can assemble the hand pies and store them in the refrigerator for up to 24 hours before baking. This is a great way to get a head start on entertaining. Just be aware that the pastry might absorb a little moisture, so they might not be quite as crisp as freshly baked ones.
What if I don’t have fresh cherries?
No problem at all! You can absolutely use frozen cherries, just be sure to thaw them and drain off any excess liquid before adding them to the filling. Canned cherry pie filling can also be used as a shortcut, though you might want to reduce the added sugar slightly.
How should I store leftover cherry cheesecake hand pies?
Store any leftover hand pies in an airtight container in the refrigerator for up to 3 days. They are delicious served cold or gently reheated in a low oven or toaster oven for a few minutes to crisp up the pastry again.
Cherry Cheesecake Hand Pies
Delicious and easy hand pies filled with a creamy cheesecake and sweet cherry mixture, perfect for a treat.
Ingredients
-
1 package refrigerated pie crust (2 crusts)
-
4 oz cream cheese, softened
-
1/4 cup granulated sugar
-
21 oz can cherry pie filling
-
1 tablespoon water
-
1/2 cup powdered sugar
-
1 teaspoon corn syrup
-
Vegetable oil, for deep frying (about 4-6 cups)
Instructions
-
Step 1
Unroll pie crusts and cut out 4-inch circles. You should get 4 circles per crust, for a total of 8. -
Step 2
In a bowl, beat softened cream cheese and granulated sugar until smooth. -
Step 3
Gently fold in the cherry pie filling into the cream cheese mixture. -
Step 4
Spoon about 2-3 tablespoons of the cherry cheesecake filling onto one half of each pie crust circle. -
Step 5
Fold the other half of the pie crust over the filling to create a semi-circle. Crimp the edges with a fork to seal. -
Step 6
Heat vegetable oil in a deep fryer or heavy-bottomed pot to 350°F (175°C). -
Step 7
Carefully fry hand pies in batches for 2-3 minutes per side, until golden brown and puffed. -
Step 8
Remove hand pies from oil and drain on paper towels. -
Step 9
Whisk together powdered sugar, water, and corn syrup to make a glaze. Drizzle over warm hand pies.
Important Information
Nutrition Facts (Per Serving)
It is important to consider this information as approximate and not to use it as definitive health advice.
Allergy Information
Please check ingredients for potential allergens and consult a health professional if in doubt.