Keto Cheesecake Mug Recipe – Quick & Easy Dessert
Keto Cheesecake In a Mug is the ultimate indulgence when that sweet craving hits and you’re sticking to your low-carb lifestyle. Forget complicated recipes and hours in the kitchen; this is your express ticket to creamy, dreamy dessert bliss. We all know the siren call of cheesecake, right? That rich, velvety texture, the perfect balance of sweet and tangy – it’s a dessert that speaks to the soul. But for those of us navigating the ketogenic path, traditional cheesecake often feels like a distant dream. That’s precisely why this Keto Cheesecake In a Mug recipe is a game-changer.
Why You’ll Fall in Love
It’s incredibly satisfying, delivering all the decadent flavors you crave without derailing your progress. What makes this Keto Cheesecake In a Mug so special is its sheer simplicity and speed. In just a few minutes, you can transform basic ingredients into a personal-sized masterpiece. It’s the perfect solution for portion control, ensuring you get your cheesecake fix without overdoing it. Plus, the clean-up is an absolute breeze – just one mug!
Keto Cheesecake In a Mug
Craving a decadent dessert but sticking to your ketogenic lifestyle? Look no further! This Keto Cheesecake In a Mug is your answer to instant gratification. Forget hours of baking and complicated recipes. With just a few simple ingredients and a microwave, you can whip up a single-serving, creamy, and satisfying cheesecake that tastes just like the real deal. It’s perfect for those moments when a sweet craving hits, and you need a quick, guilt-free indulgence. This recipe is incredibly forgiving and can be customized to your liking, making it a staple in my keto dessert arsenal. It’s so easy, even a begin extractner can achieve bakery-quality results in minutes. The beauty of this mug cake is its portion control – you get a rich, satisfying treat without overdoing it. Plus, the cleanup is a breeze, often just requiring the mug itself!
Ingredients:
Instructions:
Let’s get this delicious mug cheesecake made! The key to a smooth, lump-free cheesecake is ensuring your cream cheese is properly softened. If you’ve forgotten to take it out of the fridge in advance, don’t worry! You can soften it quickly by placing it in a microwave-safe bowl and heating it on low power for about 15-20 second intervals, stirring in between, until it’s pliable. This step is crucial for achieving that velvety texture we all love in cheesecake.
1. Creaming the Base: In your microwave-safe mug, add the softened cream cheese and the sour cream. Using a small whisk, a fork, or even a mini electric frother, vigorously beat these two ingredients together until they are completely smooth and creamy. You want to ensure there are no lumps of cream cheese remaining. This initial creaming process is vital for creating a smooth, lump-free cheesecake texture. Think of it as building the foundation for our delicious dessert. Make sure to scrape down the sides of the mug with a small spatula to incorporate all the cream cheese.
2. Sweetening and Flavoring: Now, it’s time to add the sweetness and flavor. Sprinkle in the powdered monkfruit sweetener and the vanilla extract into the mug with the cream cheese mixture. Continue whisking or mixing until the sweetener is fully incorporated and the mixture is well combined. The powdered form of monkfruit sweetener dissolves much more easily, preventing any grittiness in your final cheesecake. If you’re using a different granulated keto sweetener, ensure it’s very finely ground or pulse it in a spice grinder for a few seconds to achieve a powdered consistency. Taste a tiny bit of the batter (before adding the egg!) to ensure it’s sweet enough for your preference. You can always add a touch more sweetener if needed.
3. Incorporating the Egg: This is where our cheesecake really starts to come together. Add the room temperature egg to the mug. It’s important that the egg is at room temperature as it will emulsify better with the cream cheese mixture, resulting in a more stable and uniformly cooked cheesecake. Cold eggs can cause the mixture to curdle or seize up. Whisk everything together thoroughly until the egg is completely incorporated and the batter is smooth and homogenous. Don’t overmix at this stage, just mix until everything is well combined. You’ll notice the batter becoming a bit lighter and airier as you mix.
4. Microwaving the Magic: Place your mug in the microwave. Cook on high power for approximately 60 to 90 seconds. The exact cooking time will vary depending on the wattage of your microwave and how powerful it is. You’re looking for the edges of the cheesecake to be set, while the center might still be slightly jiggly. This is normal, as it will continue to cook and set as it cools. It’s better to undercook it slightly than to overcook it, which can lead to a rubbery texture. If after 60 seconds it’s still very liquidy, microwave in additional 15-second bursts, checking after each interval.
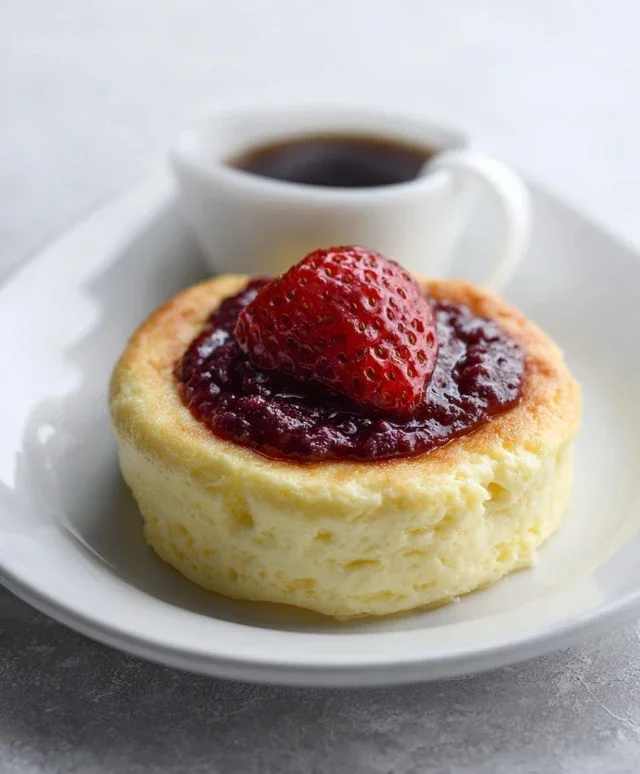
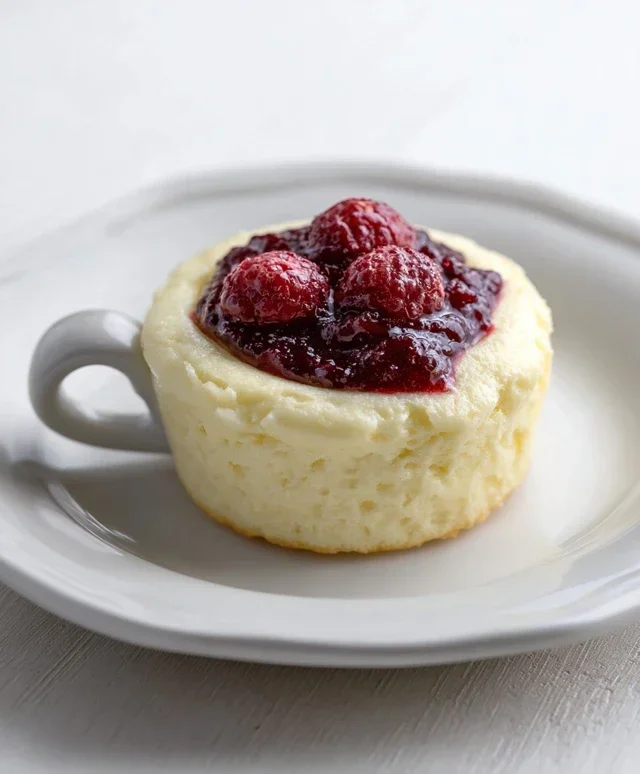
5. Cooling and Enjoying: Once cooked, carefully remove the hot mug from the microwave. Let your Keto Cheesecake In a Mug cool in the mug for at least 5-10 minutes. This cooling period is crucial for the cheesecake to fully set and develop its classic creamy texture. You can speed up the cooling process by placing the mug on a wire rack. For an even more decadent experience, you can pop it in the refrigerator for a few minutes before diggin extractg in. Serve it as is, or top with a dollop of whipped cream, a few berries, or a sprinkle of cinnamon. This quick and easy dessert is the perfect way to satisfy your sweet tooth without derailing your keto journey. Enjoy this delightful, warm, and comforting treat!
Conclusion:
So there you have it! My simple, delicious Keto Cheesecake In a Mug recipe is ready to satisfy your sweet cravings without derailing your keto lifestyle. This recipe truly shines because it’s incredibly quick to whip up, requires minimal ingredients, and delivers that rich, creamy cheesecake experience in a perfectly portioned, single-serving format. It’s the ultimate dessert solution when you need something decadent but don’t want the fuss of a whole cake.
I love serving this Keto Cheesecake In a Mug warm, straight from the microwave. For an extra touch of indulgence, consider topping it with a dollop of whipped cream, a sprinkle of chopped nuts, or a few fresh berries if your carb count allows. Don’t be afraid to get creative with variations! You could add a touch of almond extract for a different nutty flavor profile, or even a tiny pinch of cinnamon for a warming spice. The possibilities are really endless. I truly encourage you to give this a try the next time a dessert emergency strikes. You won’t regret it!
Frequently Asked Questions:
Can I make this keto cheesecake ahead of time?
While this recipe is best enjoyed fresh, you can prepare the batter a few hours in advance and store it in the refrigerator. However, for the best texture, it’s ideal to microwave it just before serving.
What if I don’t have a microwave?
You can adapt this recipe by using a small ramekin or oven-safe mug and baking it in a preheated oven at 350°F (175°C) for about 15-20 minutes, or until set. Keep an eye on it as baking times can vary.
Is this recipe truly low-carb?
Yes, by using keto-friendly sweeteners and cream cheese, this recipe is designed to be very low in carbohydrates, making it an excellent choice for those following a ketogenic diet.
Keto Cheesecake In a Mug
A quick and easy keto-friendly cheesecake recipe made in a mug, perfect for a low-carb dessert craving.
Ingredients
-
3 1/2 tbsp cream cheese (softened, 52g)
-
1/2 tbsp sour cream (7g)
-
2 tbsp powdered monkfruit sweetener (20g)
-
1 egg (room temperature)
-
1/4 tsp vanilla extract
Instructions
-
Step 1
In a microwave-safe mug, combine the softened cream cheese and sour cream. Stir until smooth. -
Step 2
Add the powdered monkfruit sweetener to the mug and mix well until fully incorporated. -
Step 3
Whisk in the room temperature egg and vanilla extract until the mixture is creamy and well combined. -
Step 4
Microwave on high for 1 to 1.5 minutes, or until the cheesecake is mostly set but still slightly jiggly in the center. -
Step 5
Let the cheesecake cool in the mug for a few minutes before enjoying directly from the mug or chilling for a firmer texture.
Important Information
Nutrition Facts (Per Serving)
It is important to consider this information as approximate and not to use it as definitive health advice.
Allergy Information
Please check ingredients for potential allergens and consult a health professional if in doubt.